Mostly we find the uses of NumPy in the problems where we are required to perform mathematical and logical operations on different sizes of arrays. Since images can also be considered as made up of arrays, we can use NumPy for performing different image processing tasks as well from scratch. In this article, we will learn about the image processing tasks that can be performed only using NumPy. This will be helpful for beginners to understand image processing from its very basics. The major operations to be performed using NumPy are listed below, which we will cover in this article.
Table of contents
- Loading image
- Cropping image
- Colours separation
- Transformation
- Grayscale conversion
- Image segmentation
Let’s start with importing libraries and loading a random image.
Loading image
import numpy as np
import matplotlib.pylab as plt
%matplotlib inline
image = plt.imread("/content/drive/MyDrive/Yugesh/image processing using numpy/images.jfif")
print(image)
Output:

Here we can see the raw form of the image. Since mathematically the images are made up of pixel values in the above output we can see that we have some numbers which define the colours in the image and the image is basically an array or NumPy array. We can also plot the image using the matplotlib library.
imgplot = plt.imshow(image)
Output:

Cropping image
After loading the image we are ready to perform actions on the image. As in very basic we can perform basic crop operations on our image. For NumPy, crop operation can be performed by slicing the array.
crop_img = image[20:199,:200,:]
imgplot = plt.imshow(crop_img)
Output:

Here we can see that we have cropped our image. Now we can move forward to our next image processing step.
Colour separation
Since we know that every image is made of pixel values and these pixel values represent three integers that are known as the RGB value of its colour. To separate the image in these colours we are required to pull out the correct slice of the image array.
fig, axs = plt.subplots(nrows=1, ncols=3, figsize=(20,8))

for c, ax in zip(range(3), axs):
    rgb_img = np.zeros(image.shape, dtype="uint8")
    rgb_img[:,:,c] = image[:,:,c]
    ax.imshow(rgb_img)
    ax.set_axis_off()
Output:

Here in the output, we can see that we have separated the RGB of the image for this we mapped the values in the range 0 to 1 and cast to type uint8. Let’s move toward our next step of image processing.
Transformations
In this step, we will perform the colour transformation. For this purpose, we can treat the image pixel as a point in space. Treating this way to image pixels allows us to perform a transformation to the colour point. Rotating the colour point can be an example of the above statement. Here we are applying Numpy’s Einstein notation function which is a method of applying a rotation matrix, pixel-wise, to the image.
def do_normalise(image):
    return -np.log(1/((1 + image)/257) - 1)
 def undo_normalise(image):
    return (1 + 1/(np.exp(-image) + 1) * 257).astype("uint8")
def rotation_matrix(theta):
    return np.c_[
        [1,0,0],
        [0,np.cos(theta),-np.sin(theta)],
        [0,np.sin(theta),np.cos(theta)]
    ]
img_norm = do_normalise(image)
img_rot = np.einsum("ijk,lk->ijl", img_norm, rotation_matrix(np.pi))
img = undo_normalise(img_rot)

imgplot = plt.imshow(img)
Output:
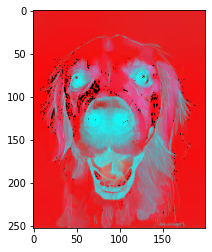
Here in the output, we can see that applied sigmoid to colour space worked and we are applying the rotation of the colour of the pixels continuously. Now in the next step, we will look at how we can convert an image to a grayscale image.
Grayscale conversion
We can also use NumPy for transforming the image into a grayscale image. By Taking the weighted mean of the RGB value of the image we can perform this.
rgb_weights = [0.2989, 0.5870, 0.1140]
grayscale_image = np.dot(image[...,:3], rgb_weights)
imgplot = plt.imshow(grayscale_image)
Output:

Here is the image of the output of our grayscale conversion process. Let’s move on to our next step of image processing.
Image segmentation
This is one of the most used image processing steps where we segment different regions of images. There are various ways to do so like foreground and background. For example, in this article, we are going to see how we can perform segmentation by converting the image into grayscale and finding a threshold. Pixels in the image that are above the threshold are in one region and others are in another region.
def simple_threshold(image, threshold=128):
    return ((image > threshold) * 255).astype("uint8")

thresholds = [100,120,128,138,150]

fig, axs = plt.subplots(nrows=1, ncols=len(thresholds), figsize=(20,5));
gray_im = to_grayscale(image)

for t, ax in zip(thresholds, axs):
    ax.imshow(simple_threshold(gray_im, t), cmap='Greys');
    ax.set_title("Threshold: {}".format(t), fontsize=20);
    ax.set_axis_off();
Output:

Here in the above output, we can see that we have segmented the image into two regions using different threshold values.
Final words
In this article, we have discussed different tasks of image processing that we have performed using the NumPy library. Also, we have used the matplotlib library for the visualization of images after processing. By Looking at the above points, we can say that we can perform other tasks as well by just using some other logic.
References