The advancements in the field of artificial intelligence and machine learning are primarily focused on highly statistical programming languages. That’s why programming languages like R have been gaining immense popularity in the field, slowly but steadily closing in on the predominant Python. With libraries and packages available for all sorts of mathematical and statistical problems, R has already entered into the hearts and machines of many data scientists and machine learning enthusiasts.
In this tutorial, we will create a simple neural network using two hot libraries in R. Following this tutorial requires you to have:
- Basic understanding of Artificial Neural Network
- Basic understanding of python and R programming languages
Neural Network in R
R is a powerful language that is best suited for machine learning and data science problems. In this tutorial, we will create a neural network in R using :
- neuralnet
- h2o
Neural Network using neuralnet library
Scaling the Data
Scaling is done to ensure that all data in the dataset falls in the same range.
max = apply(dataset, 2 , max)

min = apply(dataset, 2 , min)

scaled _dataset = as.data.frame(scale(dataset, center = min, scale = max - min))
The dataset denotes the original dataset. The above code block scales the entire dataset between the highest and lowest values in the dataset. The scaled dataset is stored as a data frame.
Splitting the dataset into training_set and test_set
library(caTools)

set.seed(123)

split = sample.split(scaled _dataset$Y, SplitRatio = 0.6)

training_set = subset(scaled _dataset, split == TRUE)

test_set = subset(scaled _dataset, split == FALSE)
The sample.split method here is used to split the scaled_dataset into training_set and test_set.
- scaled _dataset$ Y: denotes the dependent factor in the scaled dataset
- SplitRatio: denotes the ratio to split the dataset. 0.6 means 60 percent.
- trainig_set is given the 60% of data in the scaled_dataset
- test_set is given 40% of data in the scaled_dataset
Installing the neuralnet library
install.packages("neuralnet")
Importing the library
library(neuralnet)
Creating the neural network
set.seed(2)

Neural_Net = neuralnet(formula = Y ~ X1 + X2 + X3 + XN , data =  training_set, hidden = C(6,6) , linear.output = True)
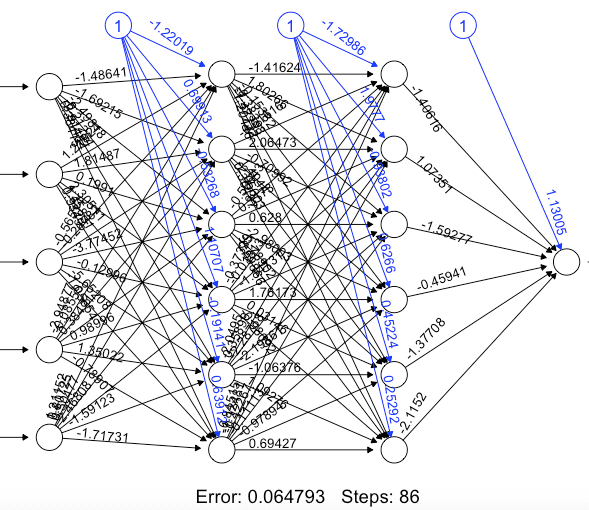
Seeding is done to conserve the uniqueness in the predicted dataset. That is the predictions will always be the same for a specific seed. The code creates a neural network with N input nodes, two hidden layers with six nodes each and an output node.
- formula: Y denotes the dependent factor, X1,X2…XN denotes the independent factors.
- data: the data used to train the network
- hidden: used to specify the hidden layers.
- linear.output: always set to True unless the argument act.fct is specified.
Visualising the network
plot(Neural_Net)
The above line displays the neural network with weights and errors.
For example for a neural network with five independent variables as input and with two hidden layers having six nodes each, the output will look like the below image:
Predicting using a neural network
test_prediction = compute(Neural_Net, testset[,i]
i: index of the independent factor. In case of multiple independent factors specify the indexes as a vector.
Example:
testset[,c(1:5)] takes all columns from 1 to 5 or testset[,c(1,2,5)] takes only columns 1, 2 and 5.
Unscaling
test_prediction = (test_prediction$net.result * (max(dataset$Y) - min(dataset$Y))) + min(dataset$Y)
This line of code reverses the effect of scaling to display the actual values.
Neural Network Using h2o Library
Scaling the Data
max = apply(dataset, 2 , max)

min = apply(dataset, 2 , min)

scaled _dataset = as.data.frame(scale(dataset, center = min, scale = max - min))
Splitting the dataset into training_set and test_set
library(caTools)

set.seed(123)

split = sample.split(scaled _dataset$Y, SplitRatio = 0.6)

training_set = subset(scaled _dataset, split == TRUE)

test_set = subset(scaled _dataset, split == FALSE)
Installing the Package
# install.packages('h2o')

library(h2o)
Initialize and Connect to H2O
h2o.init(nthreads = -1)
The above lines connect to an instance with resources.
- nthreads is used to specify the number of threads. -1 denotes all available cores can be used.
Create a classifier for ANN
model = h2o.deeplearning(y = 'Column_header', training_frame = as.h2o(training_set),

activation = 'Rectifier',

hidden = c(6,6),

train_samples_per_iteration = 10,

epochs = 20)
- y: denotes the dependent factor. The value of y is the name of the column containing the dependent values.
- training _frame: denotes the dataset the model uses to train. It should be an h2o object
- activation: denotes the activation function applied to the nodes
- train_samples_per_epoch: denotes the batch_size the model uses to train with
- epochs: one epoch stands for one complete training of the neural network with all samples.
The number of nodes are random and there in no fixed optimal values. We do not have to mention the number of nodes in the input as h2o directly identifies everything except ‘y’ in the training set as independent factors.
Predicting the Test set results
test_prediction = h2o.predict(model, newdata = as.h2o(test_set[C(indexes_of_independent_variables)]))
The above code predicts the Y values for all the X values in the test set.
Evaluating the performance on the test set
h2o.performance(model, newdata = as.h2o(test_set))
This line generates the performance metrics and values for the generated model.
Shutting down the H2O instance
h2o.shutdown()
This line shuts down the h2o instance and disconnects.


