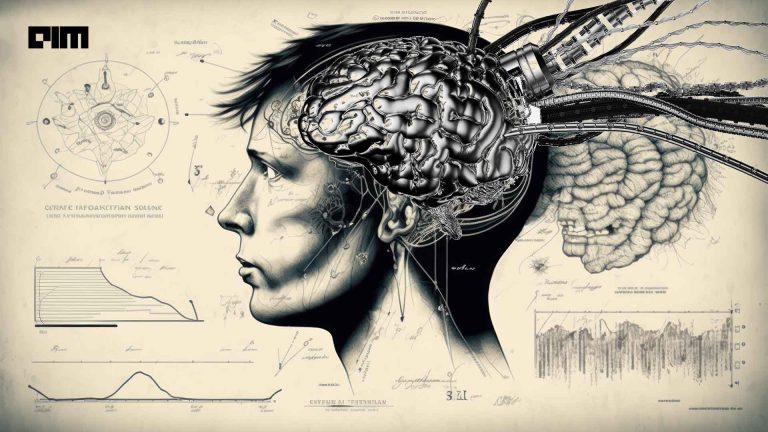


Animation and 3D Rendering is an art form of the present and the future, with hundreds of people drawn every day to its massive emotional power in movie theatres and games every year. The use of artificial intelligence to capture a 3D representation of an actor in a process of expressive movements is known as motion capture. Motion capture is a motion assisting technology that can similarly enact or resemble the motion of the objects being captured and is now widely used in film development, especially for visual effects or animation. But with the help of advanced softwares these days, it doesn’t need to have actors in Lycra suits with lots of white balls attached to them for the technique of motion capture. This has also enabled game and film companies to perform motion capture in a remote way even during the pandemic. That’s an important technological advancement, as the hassles of motion-capture systems have led to a stall in production for both movie-makers and video game companies. Markerless capture technique helps to fix this and aids motion capture that can lower the costs and hassles of doing the work.
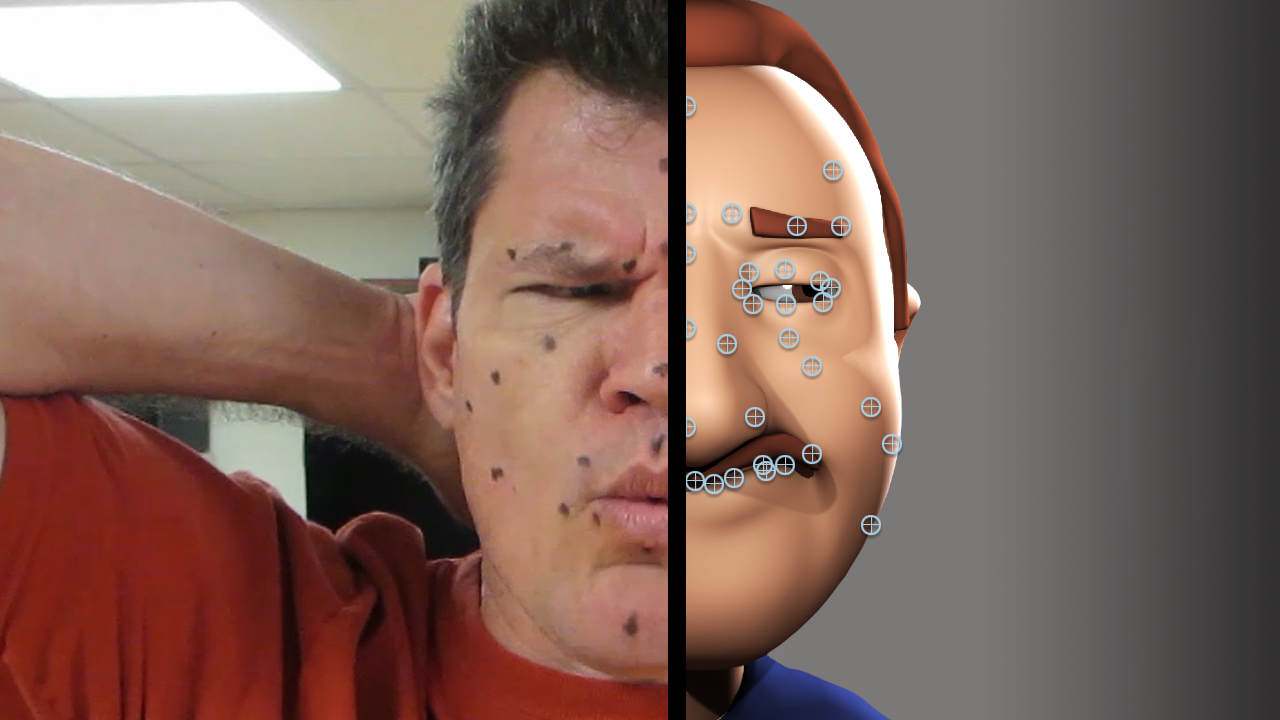
Adding face capture to 3D Animation gives users more control over expressing their vision and enhances the look of the animation. Softwares can quickly and easily render faces today, generating 3D face animations in minutes. No special hardware is needed allowing any video captured on any device to be used to generate 3D face animations. A facial motion capture database created can help describe the coordinates or relative positions of reference points on the present actor’s face. The capture might be in two dimensions, in which case the capture process is sometimes known as expression tracking, or in three dimensions. Two-dimensional capture can be achieved using a single camera and capture software. This produces a less sophisticated tracking and is unable to fully capture three-dimensional motions such as head rotations.
A three-dimensional capture is accomplished by using multi-camera rigs or laser marker systems. Such systems are generally far more expensive, complicated, and time-consuming to use. Markerless processes the assignment of annotation points to objects with a computer system so that the method becomes very simple and saves time in its operation, especially in the case of facial motion capture. The development process refers to the recording of human actors as videos and using that information to convert digital character models into animation in 2D or 3D digital computer form. This form of motion capture can also be used on other parts of the human body such as the face, legs and other objects that can be moved.
The development of motion capture is included in the category of science in computer vision, which cannot be separated from the use of electronic devices such as computers or web cameras. From the process of making this motion capture researchers have found a unique thing, where the process of making and designing it in film production or 3D modelling animation is used to make motion capture points on human faces. New ideas to summarize the motion capture process that uses image relief points on the face by replacing manipulation of face points on the computer or the process of motion capture without using the help of points on real objects are being developed more than ever. The use of markerless techniques in motion capture will facilitate the film production process by reducing the time of motion capture preparation and reducing the use of the material in motion capture. The combination of face landmark detection and rigging it in face 3D modeling also uses the transformation geometry method, an implementation using rotation and translation by distance comparison from point of face landmark or blendshape to produce real-time motion.
Facial Motion Capture Using First Order Motion Model
First Order Motion Model is an Open source library that allows you to create 3D animated videos using facial capture videos and still images. The image animation consists of generating a video sequence so that an object in a source image is animated according to the motion of the driving video. The library framework addresses this problem without using any annotation or prior information required about the specific object to animate. Once trained on a set of videos depicting objects of similar category i.e faces or human bodies, the method can be applied to any object of the class. To achieve this, it decouples the appearance and motion information using a self-supervised formulation. To provide additional support for complex motions, it uses a representation consisting of a set of learned key points along with their local affine transformations. A generator network presents models the occlusions arising during target motions and combines the appearance extracted from the source image and the motion derived from the driving video. The First Order Motion Model framework scores best on diverse benchmarks and on a variety of object categories.
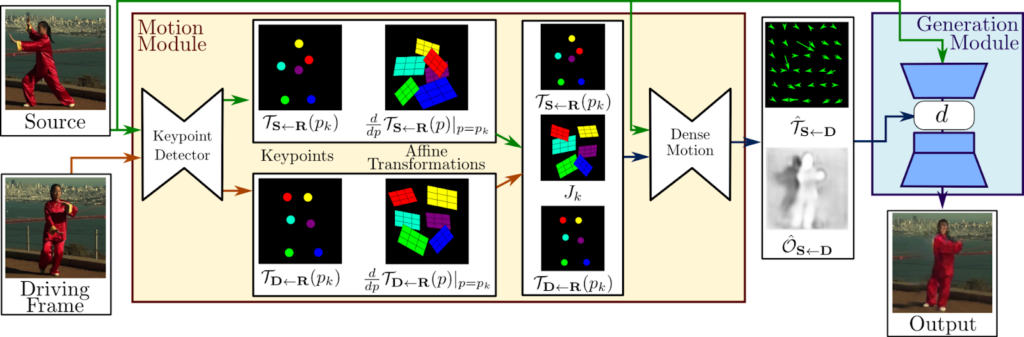
The two main modules present here are the motion estimation module and the image generation module. The purpose of the motion estimation module is to predict a dense motion field from the input image. It assumes that there exists an abstract reference frame and independently estimates two transformations: from reference to source and from reference to driving. This choice allows it to independently process source and driving frames. This is desired since, at test time the model receives pairs of the source image and driving frames sampled from a different video, which can be very different visually.
Getting Started With Code
In this article, we will be creating a model, which will produce a 3D Animated moving face render from facial motion-captured videos and a set of input images and demonstrate the power of the First Order Motion Model. The following implementation is inspired by the creators of the First Order Motion Model, whose official website can be accessed using the link here.
Installing the Library
Our first step will be to install the library components required for the model. It can be done using the following lines of code,
#Installing the Library
!pip install ffmpy &> /dev/null
!git init -q .
!git remote add origin https://github.com/AliaksandrSiarohin/first-order-model
!git pull -q origin master
!git clone -q https://github.com/graphemecluster/first-order-model-demo demo
Importing the Dependencies
Let us now import our required dependencies for the model being created.
#Importing the Dependencies
import IPython.display
import PIL.Image
import cv2
import imageio
import io
import ipywidgets
import numpy
import os.path
import requests
import skimage.transform
import warnings
from base64 import b64encode
from demo import load_checkpoints, make_animation
from ffmpy import FFmpeg
from google.colab import files, output
from IPython.display import HTML, Javascript
from skimage import img_as_ubyte
warnings.filterwarnings("ignore")
os.makedirs("user", exist_ok=True)
Creating the Display Space
To display our results, let us create a display space using HTML components. We will also be creating a few buttons to generate the results.
#Creating the Display Space
display(HTML("""
<style>
.widget-box > * {
  flex-shrink: 0;
}
.widget-tab {
  min-width: 0;
  flex: 1 1 auto;
}
.widget-tab .p-TabBar-tabLabel {
  font-size: 15px;
}
.widget-upload {
  background-color: tan;
}
.widget-button {
  font-size: 18px;
  width: 160px;
  height: 34px;
  line-height: 34px;
}
.widget-dropdown {
  width: 250px;
}
.widget-checkbox {
    width: 650px;
}
.widget-checkbox + .widget-checkbox {
    margin-top: -6px;
}
.input-widget .output_html {
  text-align: center;
  width: 266px;
  height: 266px;
  line-height: 266px;
  color: lightgray;
  font-size: 72px;
}
div.stream {
  display: none;
}
.title {
  font-size: 20px;
  font-weight: bold;
  margin: 12px 0 6px 0;
}
.warning {
  display: none;
  color: red;
  margin-left: 10px;
}
.warn {
  display: initial;
}
.resource {
  cursor: pointer;
  border: 1px solid gray;
  margin: 5px;
  width: 160px;
  height: 160px;
  min-width: 160px;
  min-height: 160px;
  max-width: 160px;
  max-height: 160px;
  -webkit-box-sizing: initial;
  box-sizing: initial;
}
.resource:hover {
  border: 6px solid crimson;
  margin: 0;
}
.selected {
  border: 6px solid seagreen;
  margin: 0;
}
.input-widget {
  width: 266px;
  height: 266px;
  border: 1px solid gray;
}
.input-button {
  width: 268px;
  font-size: 15px;
  margin: 2px 0 0;
}
.output-widget {
  width: 256px;
  height: 256px;
  border: 1px solid gray;
}
.output-button {
  width: 258px;
  font-size: 15px;
  margin: 2px 0 0;
}
.uploaded {
  width: 256px;
  height: 256px;
  border: 6px solid seagreen;
  margin: 0;
}
.label-or {
  align-self: center;
  font-size: 20px;
  margin: 16px;
}
.loading {
  align-items: center;
  width: fit-content;
}
.loader {
  margin: 32px 0 16px 0;
  width: 48px;
  height: 48px;
  min-width: 48px;
  min-height: 48px;
  max-width: 48px;
  max-height: 48px;
  border: 4px solid whitesmoke;
  border-top-color: gray;
  border-radius: 50%;
  animation: spin 1.8s linear infinite;
}
.loading-label {
  color: gray;
}
.comparison-widget {
  width: 256px;
  height: 256px;
  border: 1px solid gray;
  margin-left: 2px;
}
.comparison-label {
  color: gray;
  font-size: 14px;
  text-align: center;
  position: relative;
  bottom: 3px;
}
@keyframes spin {
  from { transform: rotate(0deg); }
  to { transform: rotate(360deg); }
}
</style>
"""))
Further defining the components for each button and setting functionalities.
#Defining the components for each button
def thumbnail(file):
  return imageio.get_reader(file, mode='I', format='FFMPEG').get_next_data()

def create_image(i, j):
  image_widget = ipywidgets.Image(
    value=open('demo/images/%d%d.png' % (i, j), 'rb').read(),
    format='png'
  )
  image_widget.add_class('resource')
  image_widget.add_class('resource-image')
  image_widget.add_class('resource-image%d%d' % (i, j))
  return image_widget

def create_video(i):
  video_widget = ipywidgets.Image(
    value=cv2.imencode('.png', cv2.cvtColor(thumbnail('demo/videos/%d.mp4' % i), cv2.COLOR_RGB2BGR))[1].tostring(),
    format='png'
  )
  video_widget.add_class('resource')
  video_widget.add_class('resource-video')
  video_widget.add_class('resource-video%d' % i)
  return video_widget

def create_title(title):
  title_widget = ipywidgets.Label(title)
  title_widget.add_class('title')
  return title_widget

def download_output(button):
  complete.layout.display = 'none'
  loading.layout.display = ''
  files.download('output.mp4')
  loading.layout.display = 'none'
  complete.layout.display = ''

def convert_output(button):
  complete.layout.display = 'none'
  loading.layout.display = ''
  FFmpeg(inputs={'output.mp4': None}, outputs={'scaled.mp4': '-vf "scale=1080x1080:flags=lanczos,pad=1920:1080:420:0" -y'}).run()
  files.download('scaled.mp4')
  loading.layout.display = 'none'
  complete.layout.display = ''

def back_to_main(button):
  complete.layout.display = 'none'
  main.layout.display = ''
Setting the Label Components,
#Setting the label components

label_or = ipywidgets.Label('or')
label_or.add_class('label-or')

image_titles = ['Peoples', 'Cartoons', 'Dolls', 'Game of Thrones', 'Statues']
image_lengths = [8, 4, 8, 9, 4]

image_tab = ipywidgets.Tab()
image_tab.children = [ipywidgets.HBox([create_image(i, j) for j in range(length)]) for i, length in enumerate(image_lengths)]
for i, title in enumerate(image_titles):
  image_tab.set_title(i, title)

input_image_widget = ipywidgets.Output()
input_image_widget.add_class('input-widget')
upload_input_image_button = ipywidgets.FileUpload(accept='image/*', button_style='primary')
upload_input_image_button.add_class('input-button')
image_part = ipywidgets.HBox([
  ipywidgets.VBox([input_image_widget, upload_input_image_button]),
  label_or,
  image_tab
])

video_tab = ipywidgets.Tab()
video_tab.children = [ipywidgets.HBox([create_video(i) for i in range(5)])]
video_tab.set_title(0, 'All Videos')

input_video_widget = ipywidgets.Output()
input_video_widget.add_class('input-widget')
upload_input_video_button = ipywidgets.FileUpload(accept='video/*', button_style='primary')
upload_input_video_button.add_class('input-button')
video_part = ipywidgets.HBox([
  ipywidgets.VBox([input_video_widget, upload_input_video_button]),
  label_or,
  video_tab
])

model = ipywidgets.Dropdown(
  description="Model:",
  options=[
    'vox',
    'vox-adv',
    'taichi',
    'taichi-adv',
    'nemo',
    'mgif',
    'fashion',
    'bair'
  ]
)
warning = ipywidgets.HTML('<b>Warning:</b> Upload your own images and videos (see README)')
warning.add_class('warning')
model_part = ipywidgets.HBox([model, warning])

relative = ipywidgets.Checkbox(description="Relative keypoint displacement (Inherit object proporions from the video)", value=True)
adapt_movement_scale = ipywidgets.Checkbox(description="Adapt movement scale (Don’t touch unless you know want you are doing)", value=True)
generate_button = ipywidgets.Button(description="Generate", button_style='primary')
main = ipywidgets.VBox([
  create_title('Choose Image'),
  image_part,
  create_title('Choose Video'),
  video_part,
  create_title('Settings'),
  model_part,
  relative,
  adapt_movement_scale,
  generate_button
])

loader = ipywidgets.Label()
loader.add_class("loader")
loading_label = ipywidgets.Label("This may take several minutes to process…")
loading_label.add_class("loading-label")
loading = ipywidgets.VBox([loader, loading_label])
loading.add_class('loading')

output_widget = ipywidgets.Output()
output_widget.add_class('output-widget')
download = ipywidgets.Button(description='Download', button_style='primary')
download.add_class('output-button')
download.on_click(download_output)
convert = ipywidgets.Button(description='Convert to 1920×1080', button_style='primary')
convert.add_class('output-button')
convert.on_click(convert_output)
back = ipywidgets.Button(description='Back', button_style='primary')
back.add_class('output-button')
back.on_click(back_to_main)

comparison_widget = ipywidgets.Output()
comparison_widget.add_class('comparison-widget')
comparison_label = ipywidgets.Label('Comparison')
comparison_label.add_class('comparison-label')
complete = ipywidgets.HBox([
  ipywidgets.VBox([output_widget, download, convert, back]),
  ipywidgets.VBox([comparison_widget, comparison_label])
])
Setting the Algorithm Pipeline
With our display space all set up, we can finally create our model’s image processing pipeline which will, in turn, render our animated 3D video for us.
#setting the algorithm

selected_image = None
def select_image(filename):
  global selected_image
  selected_image = resize(PIL.Image.open('demo/images/%s.png' % filename).convert("RGB"))
  input_image_widget.clear_output(wait=True)
  with input_image_widget:
    display(HTML('Image'))
  input_image_widget.remove_class('uploaded')
output.register_callback("notebook.select_image", select_image)

selected_video = None
def select_video(filename):
  global selected_video
  selected_video = 'demo/videos/%s.mp4' % filename
  input_video_widget.clear_output(wait=True)
  with input_video_widget:
    display(HTML('Video'))
  input_video_widget.remove_class('uploaded')
output.register_callback("notebook.select_video", select_video)

def resize(image, size=(256, 256)):
    w, h = image.size
    d = min(w, h)
    r = ((w - d) // 2, (h - d) // 2, (w + d) // 2, (h + d) // 2)
    return image.resize(size, resample=PIL.Image.LANCZOS, box=r)

def upload_image(change):
  global selected_image
  for name, file_info in upload_input_image_button.value.items():
    content = file_info['content']
  if content is not None:
    selected_image = resize(PIL.Image.open(io.BytesIO(content)).convert("RGB"))
    input_image_widget.clear_output(wait=True)
    with input_image_widget:
      display(selected_image)
    input_image_widget.add_class('uploaded')
    display(Javascript('deselectImages()'))
upload_input_image_button.observe(upload_image, names='value')

def upload_video(change):
  global selected_video
  for name, file_info in upload_input_video_button.value.items():
    content = file_info['content']
  if content is not None:
    selected_video = 'user/' + name
    preview = resize(PIL.Image.fromarray(thumbnail(content)).convert("RGB"))
    input_video_widget.clear_output(wait=True)
    with input_video_widget:
      display(preview)
    input_video_widget.add_class('uploaded')
    display(Javascript('deselectVideos()'))
    with open(selected_video, 'wb') as video:
      video.write(content)
upload_input_video_button.observe(upload_video, names='value')

def change_model(change):
  if model.value.startswith('vox'):
    warning.remove_class('warn')
  else:
    warning.add_class('warn')
model.observe(change_model, names='value')

def generate(button):
  main.layout.display = 'none'
  loading.layout.display = ''
  filename = model.value + ('' if model.value == 'fashion' else '-cpk') + '.pth.tar'
  if not os.path.isfile(filename):
    download = requests.get(requests.get('https://cloud-api.yandex.net/v1/disk/public/resources/download?public_key=https://yadi.sk/d/lEw8uRm140L_eQ&path=/' + filename).json().get('href'))
    with open(filename, 'wb') as checkpoint:
      checkpoint.write(download.content)
  reader = imageio.get_reader(selected_video, mode='I', format='FFMPEG')
  fps = reader.get_meta_data()['fps']
  driving_video = []
  for frame in reader:
    driving_video.append(frame)
  generator, kp_detector = load_checkpoints(config_path='config/%s-256.yaml' % model.value, checkpoint_path=filename)
  predictions = make_animation(
    skimage.transform.resize(numpy.asarray(selected_image), (256, 256)),
    [skimage.transform.resize(frame, (256, 256)) for frame in driving_video],
    generator,
    kp_detector,
    relative=relative.value,
    adapt_movement_scale=adapt_movement_scale.value
  )
  if selected_video.startswith('user/') or selected_video == 'demo/videos/0.mp4':
    imageio.mimsave('temp.mp4', [img_as_ubyte(frame) for frame in predictions], fps=fps)
    FFmpeg(inputs={'temp.mp4': None, selected_video: None}, outputs={'output.mp4': '-c copy -y'}).run()
  else:
    imageio.mimsave('output.mp4', [img_as_ubyte(frame) for frame in predictions], fps=fps)
  loading.layout.display = 'none'
  complete.layout.display = ''
  with output_widget:
    display(HTML('<video id="left" controls src="data:video/mp4;base64,%s" />' % b64encode(open('output.mp4', 'rb').read()).decode()))
  with comparison_widget:
    display(HTML('<video id="right" muted src="data:video/mp4;base64,%s" />' % b64encode(open(selected_video, 'rb').read()).decode()))
  display(Javascript("""
  (function(left, right) {
    left.addEventListener("play", function() {
      right.play();
    });
    left.addEventListener("pause", function() {
      right.pause();
    });
    left.addEventListener("seeking", function() {
      right.currentTime = left.currentTime;
    });
  })(document.getElementById("left"), document.getElementById("right"));
  """))

#generate button for displaying the result

generate_button.on_click(generate)

loading.layout.display = 'none'
complete.layout.display = 'none'
select_image('00')
select_video('0')
Output :
Input Image :

Processed Output :
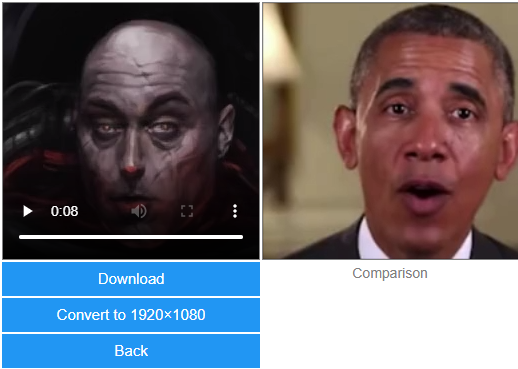
The generated output will provide us with a 3D rendered animated video for our provided input image.
End Notes
In this article, we understood how artificial intelligence is being used to create 3D animations harnessing the power of facial motion capture. We also saw how the First Order Motion Model helps create 3D animations using facial capture videos and brings life to still images while keeping the facial expressions intact. The following implementation can be found as a Colab notebook which can be accessed using the ink here.
Happy Learning!