The performance of any supervised deep learning model is highly dependent on the amount and diversity of data being fed to the model. You can easily relate this relation like, say, you (the DL model) have participated in a long run competition of about 200M. To conquer this competition, you need to prepare very hard. Your preparation(data augmentation) includes daily running, proper diet, extensive workout and so on. Similarly, for deep learning image-based classification tasks, for a particular problem, to make your model robust to any input data concerned to your problem, you have to create additional data with a variety of it, and comes the role of data augmentation.
The recent advancement in deep learning models has been largely attributed to the quantity and diversity of data gathered in recent years. Data augmentation in data analysis is a technique used to increase the amount of data available in hand by adding slightly modified copies of it or synthetically created files of the same data. It acts as a regularizer for DL models and helps to reduce tricky problems like overfitting while training. This technique is closely related to oversampling in data analysis.
Computer vision tasks such as image classification, object detection, and segmentation have been highly successful among popular deep learning applications. Data augmentation can be effectively used to train the deep learning model in those applications. Some of the simplest transformations applied to image augmentation are; geometric transformations such as Flipping, Rotation, Translation cropping, scaling, and color space transformation such as color casting, varying brightness, and noise injection.
Google has pushed the SOTA accuracy on datasets such as CIFAR-10 with AutoAugment, a new automated data augmentation technique. AutoAugment has shown that prior work using just applying a fixed transformation set like horizontal flipping or padding and cropping showed potential performance on the table. AutoAugment introduces 16 geometric and colour-based transformations and formulates an augmentation policy that selects up to two transformations at certain magnitude levels to apply to each batch of the data.
The below table shows the result of various performance metrics with and without augmentation.

Today in this article, we will discuss some of the common image augmentation techniques used while dealing with image-based tasks. This article demonstrates the data augmentation techniques, firstly using Keras preprocessing layer and tensorflow.image class.
Code implementation of Customized Data Augmentation Using Tensorflow
Import all dependencies:
 import tensorflow as tf
 import tensorflow_datasets as tfds
 from tensorflow.keras import layers
 import numpy as np
 import matplotlib.pyplot as plt
Prepare the dataset:
We have used the cat vs dog dataset from the Tensorflow dataset. In addition, the TF dataset has a variety of datasets for various supervised and unsupervised tasks.
(train_,val_,test_), meta = tfds.load('cats_vs_dogs',split=['train[:80%]', 'train[80%:90%]', 'train[90%:]'], with_info=True, as_supervised=True)
Retrieve an image from a dataset that will further use to demonstrate data augmentation

Augmentation using Keras Preprocessing layers:
We can use preprocessing layers such as resize and rescale as follows.
 img_width, img_height = 200,200
 resize_rescale = tf.keras.Sequential([
           layers.experimental.preprocessing.Resizing(img_width, img_height),
           layers.experimental.preprocessing.Rescaling(1./255)
 ])
 results = resize_rescale(image)
 plt.imshow(results[0])
 plt.axis('off')
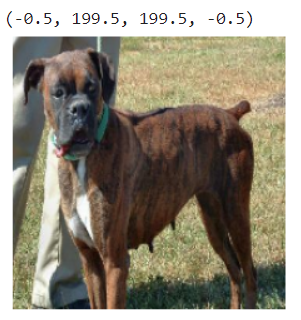
Let’s create the preprocessing layer and apply it repeatedly to an image to see the horizontal and vertical flips and rotation.
 data_aug = tf.keras.Sequential([
   layers.experimental.preprocessing.RandomFlip("horizontal_and_vertical"),
   layers.experimental.preprocessing.RandomRotation(0.2),
 ])
 # add image to batch
 image = tf.expand_dims(image,0)
 plt.figure(figsize=(15,10))
 for i in range(9):
   aug_image = data_aug(image)
   ax = plt.subplot(3,3,i+1)
   plt.imshow(aug_image[0])
   plt.axis('off')
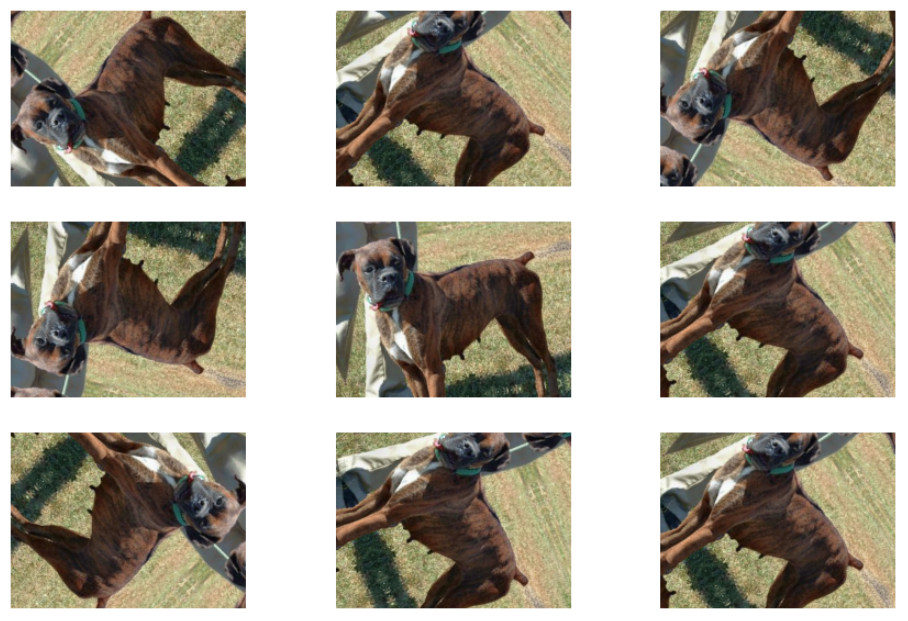
We can apply these preprocessing layers; one is directly using these layers into your models as below.
 model = tf.keras.Sequential([
       resize_rescale,
       data_aug,
       layers.Conv2D(20,3,padding='same',activation='relu'),
       layers.MaxPooling2D(),
       ## rest of your model
 ])
By doing so, data augmentation will run synchronously with the rest of your layers and take benefit from GPU acceleration. When we export this model using model.save the preprocessing layers will also get saved with the rest of the layers; later on, when we deploy this model, it will automatically standardize images according to the model’s configuration. This will save us time while developing the same logic on the server side.
These preprocessing layers will be inactive when you try to evaluate or test the model. Thus, augmentation will only take place while fitting the model.
The second way of using these layers directly to our dataset. With this approach, we can use Dataset.map() to create a dataset that yields batches of augmented images.
aug_ds = train_.map(lambda x,y: (resize_rescale(x, training=True), y))
This kind of augmentation will happen asynchronously on the CPU and is non-blocking. We can overlap the training of our model on the GPU with data preprocessing, using dataset.prefetch as shown below.
Configure the train, validation and test dataset with preprocessing layers. We will also configure the dataset for the performance using parallel reads and buffered prefetching without I/O becoming blocking.
 batch_size = 30
 autotune = tf.data.AUTOTUNE
 def prepare(ds,shuffle=False,augment=False):
   # resize and rescale all dataset
   ds = ds.map(lambda x,y: (resize_rescale(x, training=True), y), num_parallel_calls = autotune)
   if shuffle:
     ds = ds.shuffle(1000)
   # batch all dataset
   ds = ds.batch(batch_size)
   # use aug only on training set
   if augment:
     ds = ds.map(lambda x,y: (resize_rescale(x, training=True), y),num_parallel_calls = autotune)
   # use buffered prefechting on all ds
   return ds.prefetch(buffer_size=autotune)
 train_ds = prepare(train_, shuffle=True, augment=True)
 val_ds = prepare(val_)
 test_ds = prepare(test_)
Prepare the model; for complete model we will train the model using above data created
 model = tf.keras.Sequential([
          layers.Conv2D(20,3,padding='same',activation='relu'),
          layers.MaxPooling2D(),
          layers.Conv2D(40,3,padding='same',activation='relu'),
          layers.MaxPooling2D(),
          layers.Conv2D(60,3,padding='same',activation='relu'),
          layers.MaxPooling2D(),
          layers.Flatten(),
          layers.Dense(150, activation='relu'),
          layers.Dense(classes_)
 ])
 model.compile(loss = tf.keras.losses.SparseCategoricalCrossentropy(from_logits=True),metrics=['accuracy'],optimizer='adam')
history = model.fit(train_ds, validation_data=val_ds,epochs=5)

Data augmentation using customized layers:
The below code shows custom augmentation; first, we will create a layers.Lambda layer. Next, we will write a new layer via subclassing, which gives us more control. Finally, both layers will randomly invert the color in the image.
 def random_invert_img(x, p=0.6):
   if tf.random.uniform([]) < p:
     x = (255 - x)
   else:
     x
   return x
 def random_inv(factor = 0.65):
   return layers.Lambda(lambda x:random_invert_img(x, factor))
 random_invert = random_inv()
 plt.figure(figsize=(12,12))
 for i in range(9):
   aug_image = random_invert(image)
   ax = plt.subplot(3, 3, i + 1)
   plt.imshow(aug_image[0].numpy().astype('uint8'))
   plt.axis('off')

 class RandomInv(layers.Layer):
   def __init__(self,factor=0.5,**kwargs):
     super().__init__(**kwargs)
     self.factor = factor
   def call(self, x):
     return random_invert_img(x)
plt.imshow(RandomInv()(image)[0])

Augmentation using tf.image:
The above preprocessing utilities are convenient. However, to get more control, we can write the augmentation layers by tf.image.
image, label = next(iter(train_))
The following code used to compare the results side by side.
 def showcase(original,augmented):
   plt.figure(figsize=(8,8))
   plt.subplot(1,2,1)
   plt.title('Original')
   plt.imshow(original)
   plt.axis('off')
   plt.subplot(1,2,2)
   plt.title('Augmented')
   plt.imshow(augmented)
   plt.axis('off')
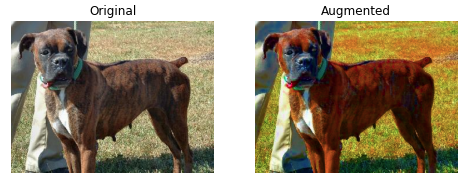
Saturate image by tf.image.adjust_saturation by providing saturation factor
 saturated = tf.image.adjust_saturation(image,3)
 showcase(image, saturated)
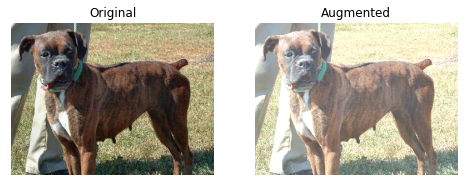
Adjusting the brightness, central cropping
 bright = tf.image.adjust_brightness(image,0.3)
 showcase(image,bright)
 crop = tf.image.central_crop(image,central_fraction=0.8)
 showcase(image,crop)

Random contrast
 for i in range(3):
   seed = (i,0)
   random_contrast = tf.image.stateless_random_contrast(image,seed = seed,lower=0.1,upper=0.9)
   showcase(image,random_contrast)

Conclusion:
We have seen how to obtain custom image data augmentation using Keras preprocessing layers and tf.image. We can synthesise the dataset based on our needs; this gives full control to create a synthesised dataset. On the other hand, we can also use various GAN based architecture to do so.


