

Table of contents
Introduction
SOLO (segment objects by locations) is a simple and flexible framework applied for accomplishing instance segmentation in digital image processing and computer vision tasks. It is based on the notion of “instance categories” for instance segmentation in which each pixel within an instance of an object is assigned a category based on its location and size.
SOLO was introduced by Xinlong Wang and Chunhua Shen at The University of Adelaide, Australia along with Tao Kong, Yuning Jiang 2 and Lei Li of the ByteDance AI Lab in July 2020 (revised version v3). Click here to read the research paper.
Before moving on to the details of the SOLO approach, let us first understand the concept of instance segmentation.
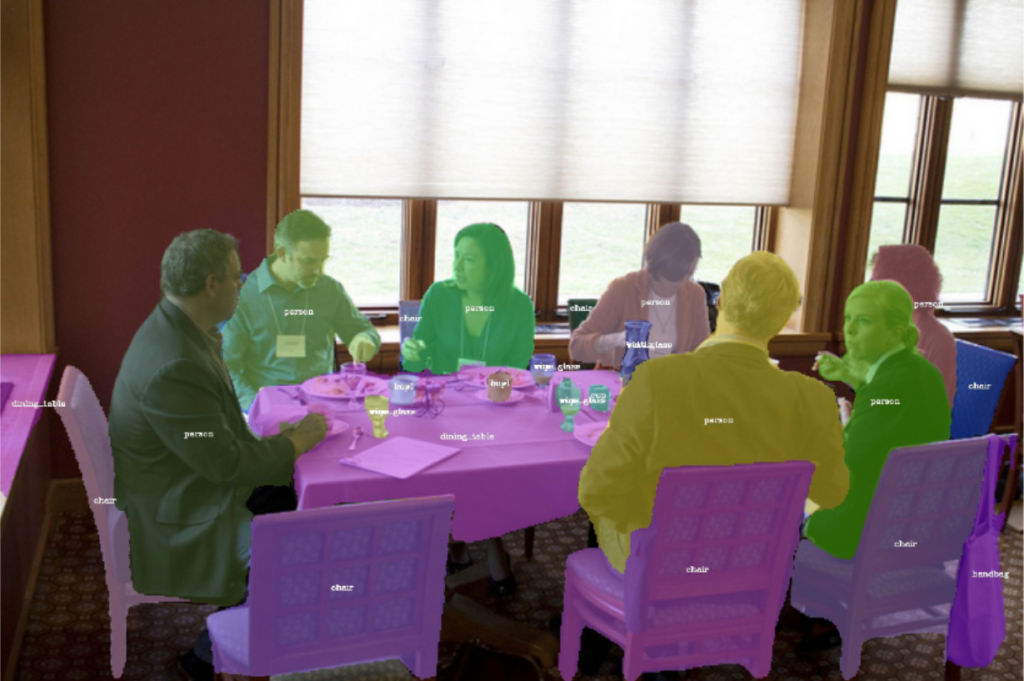
Instance segmentation is different from semantic segmentation method. Semantic segmentation refers to the process of associating every pixel of an image with a class label such as a person, flower, car and so on. It treats multiple objects of the same class as a single entity. On the contrary, instance segmentation treats multiple objects of the same class as distinct individual instances.

As shown in the above figure, semantic segmentation identifies all the entities belonging to the ‘person’ category whereas instance segmentation identifies each individual within the category as a different entity (person1, person2 etc.).
All the objects comprising an image belong to a fixed set of semantic categories so semantic segmentation can be easily formulated as a dense per-pixel classification problem. However, the number of instances in each semantic category may vary and hence, it is a challenging task to predict instance labels directly following the same paradigm as semantic segmentation.
Central Idea of SOLO
SOLO reforms the task of instance segmentation into two simultaneously performed classification tasks. It first divides an input image into uniform grids. If the centre of an object lies in a grid cell, that cell has to perform the following two tasks:
- Predict the semantic category
- The segment that object’s instance(s)

SOLO differentiates object instances in an image based on ‘instance categories’ i.e., the quantized centre locations and object sizes. The concept of instance categories allows us to Segment Objects by LOcations and hence the name, SOLO.
Recent instance segmentation methods follow one of the two approaches:
- Top-down approach: Detect bounding boxes around the object(s) and then segment the instance mask in each bounding box to distinguish separate instances of the object (called ‘detect-then-segment’ approach)
- Bottom-up approach: Pull close pixels of the same instances and push away the pixels of different instances, thus creating an affinity relationship between them and assigning an embedding vector to each pixel. Then group similar pixels to delineate instances.
The above paradigms are step-wise and more importantly ‘indirect’ i.e. they rely on precise detection of bounding boxes or embedding learning followed by pixels’ grouping process. On the contrary, SOLO is a ‘direct’ approach relying on full mask annotations.
Practical implementation of SOLO
Installation:
The installation process is based on MMDetection (v1.0.0) (MMDetection is an open-source toolbox based on PyTorch and used for object detection).
Prerequisites:
- Linux (Windows – not supported officially)
- Python 3.5+
- PyTorch 1.1 or higher (version higher than 1.5 is not tested)
- CUDA 9.0 or higher
- NCCL 2
- GCC 4.9 or higher
- mmcv 0.2.16
Script for setting up SOLO with conda and linking the dataset path is as follows:
Create conda virtual environment and activate it
 conda create -n solo python=3.7 -y
 conda activate solo
Install PyTorch and torchvision
conda install -c pytorch pytorch torchvision -y
Install the compiled programming language – Cython
conda install cython -y
Clone the SOLO GitHub repository
 git clone https://github.com/WXinlong/SOLO.git
 cd SOLO
Install build requirements followed by SOLO
 pip install -r requirements/build.txt
 pip install "git+https://github.com/cocodataset/cocoapi.git#subdirectory=PythonAPI"
 pip install -v -e.
Link the dataset path
 mkdir data
 ln -s DATASET_PATH data
Once the installation is successfully completed, download the required model (list of provided models is available here) and then run the .py code file coded as follows:
from mmdet.apis import init_detector, inference_detector, show_result_pyplot, show_result_ins
Define the config file path e.g.
config = ‘../config/solo/decoupled_solo_r50_fpn_8gpu_3x.py’
Download checkpoint from the model zoo and place it in ‘checkpoints/’
checkpt = '../checkpoints/DECOUPLED_SOLO_R50_3x.pth'
Build the model from config file and checkpoint file
model = init_detector(config, checkpt, device='cuda:0')
Test a single image, say abc.jpg
 test_image = ‘abc.jpg’
 test_result = inference_detector’(model, test_image)
 show_result_ins(test_image, test_result, model.CLASSES, score_thr=0.25,
 out_file="output.jpg")
Train with a single GPU
python tools/train.py ${CONFIG_FILE}
Train with multiple GPUs
./tools/dist_train.sh ${CONFIG_FILE} ${GPU_NUM}
Test with a single GPU
python tools/test_ins.py ${CONFIG_FILE} ${CHECKPOINT_FILE} --show --out ${OUTPUT_FILE} --eval segm
Test with multiple GPUs
./tools/dist_test.sh ${CONFIG_FILE} ${CHECKPOINT_FILE} ${GPU_NUM} --show --out ${OUTPUT_FILE} --eval segm
Visualize the results
python tools/test_ins_vis.py ${CONFIG_FILE} ${CHECKPOINT_FILE} --show --save_dir ${SAVE_DIRECTORY}
Source: GitHub repository
Pros of SOLO
- Totally box-free: SOLO is not restricted by (anchor) box locations and scales and hence benefit from the inherent advantages of Fully Connected Networks (FCNs).
- Direct instance segmentation: SOLO takes an image as input, directly outputs instance masks and the corresponding semantic class probabilities in a fully convolutional, box-free and grouping-free paradigms
Limitations of SOLO
- inefficient mask representation and embedding learning
- not high enough resolution for finer mask predictions
- slow mask Non-Maximum Suppression (NMS)
The above-mentioned bottlenecks of SOLO are eliminated by a dynamic and faster framework called SOLOv2.
Overview of SOLOv2
SOLOv2 was proposed by Xinlong Wang and Chunhua Shen of The University of Adelaide (Australia), Rufeng Zhang of Tongji University (China) as well as Tao Kong and Lei Li of ByteDance AI Lab in October, 2020. Refer to the SOLOv2 research paper to understand its working and underlying concepts.
SOLOv2 is a dynamic scheme for segmenting objects by locations. It divides the mask learning process into two parts: convolution kernel learning and feature learning. It predicts mask kernels dynamically according to the input while assigning appropriate location categories to different pixels. It then constructs a unified and high-resolution mask feature representation for instance-aware segmentation. The process of learning the mask kernels and mask features can be carried out separately with efficiency. To prevent duplicate predictions, it employs a matrix NMS algorithm
Practical implementation of SOLOv2
Click here and follow the installation steps before proceeding further!
Run the following command lines:
 wget https://cloudstor.aarnet.edu.au/plus/s/chF3VKQT4RDoEqC/download -O SOLOv2_R50_3x.pth
 python demo/demo.py \
     --config-file configs/SOLOv2/R50_3x.yaml \
     --input input1.jpg input2.jpg \
     --opts MODEL.WEIGHTS SOLOv2_R50_3x.pth
Set up the required dataset e.g. MS-COCO
Train the model on COCO
 OMP_NUM_THREADS=1 python tools/train_net.py \
     --config-file configs/SOLOv2/R50_3x.yaml \
     --num-gpus 8 \
     OUTPUT_DIR training_dir/SOLOv2_R50_3x
Evaluate the model on COCO
 OMP_NUM_THREADS=1 python tools/train_net.py \
     --config-file configs/SOLOv2/R50_3x.yaml \
     --eval-only \
     --num-gpus 8 \
     OUTPUT_DIR training_dir/SOLOv2_R50_3x \
     MODEL.WEIGHTS training_dir/SOLOv2_R50_3x/model_final.pth
Source: GitHub repository
Refer to the following links to have a deep understanding of SOLO and SOLOv2: