

CenterMask is the first-ever “anchor-free” instance segmentation technique. Youngwan Lee and Jongyoul Park, researchers at the Electronics and Telecommunications Research Institute (ETRI), South Korea, introduced this technique- in April 2020 (research paper).
If you are unaware of the term ‘instance segmentation’, refer to this article before proceeding!
Why CenterMask?
Top-down instance segmentation methods such as Mask R-CNN have become popular in image segmentation but have a disadvantage of being slow techniques. YOLACT is the first real-time instance segmentation technique. Though it resolves the issue of slow-paced segmentation, it lags in terms of accuracy. CenterMask aims to attain a balance between the speed of performing the segmentation and model accuracy.
Besides, conventional object detectors rely on pre-defined anchor boxes. Such anchor boxes pose the following issues:
(i) they are sensitive to various kinds of datasets and hyperparameters such as aspect ratio and input size
(ii) too many anchor boxes can cause imbalance between positive and negative samples resulting in higher computation cost and memory requirements
CenterMask resolves the problems mentioned above by being an “anchor-free” segmentation method.
CenterMask architecture
CenterMask employs different architectures for various sub-tasks as follows:
- Feature extraction is performed using VoVNet v2 (an improved version of VoVNet model – CNN which concatenates all the features in the last feature map thereby making input size constant and enabling enlargement of new output channels)
- Object detection part is done by FCOS – a Fully Convolutional anchor-free One Stage object detector which works in a per-pixel way of prediction
- Segmentation is done by SAG Mask (Spatial Attention-Guided Mask). This instance segmentation module uses a Spatial Attention Module (SAM) to focus on meaningful, informative pixels and suppress the uninformative ones (noise).
The following figure gives an overview of the whole architecture:

Image source: Research paper
Highlighting features
- CenterMask is the first anchor-free one-stage instance segmentation method.
- Besides CenterMask, the lightweight CenterMask-Lite method designed for small-scale models can run at real-time speed (exceeding 30 fps) (fps: frames per second).
- CenterMask outperforms state-of-the-art models such as Mask R-CNN, ShapeMask and TensorMask
- CenterMask-Lite models can outperform YOLACT or YOLACT++
- Using VoVNetV2 as the backbone architecture, CenterMask performs better and faster than HRNet or ResNe(X)t
Practical implementation
Here’s a demonstration of performing instance segmentation on a custom image using CenterMask. Step-wise explanation of the code implemented in Google colab is as follows:
- Import required libraries
 import os   #for interacting with OS
 from os.path import basename, join, splitext, exists
"""
join() joins one or more path components,
basename() gives the base name in specified path,
exists() checks whether the specified path exists or not
splittext() splits the path name into root and extension
"""
 import sys
 #path of CenterMask’s GitHub repository
 repo_path = 'https://github.com/youngwanLEE/CenterMask.git'
 #extract project name ‘CenterMask’ from the GitHub URL
 prj = splitext(basename(repo_path))[0]
 """
 basename(repo_path) gives output ‘CenterMask.git’; then applying splitext() will result into a list as (‘CenterMask’, ‘.git’). [0] will extract first element from this list i.e. ‘CenterMask’
 """
 #If the path does not exist, clone the GitHub repository
 if not exists(prj):
              !git clone -q {repo_path}
 #install dependencies
    !pip install -q ninja yacs cython tqdm
 #change directory to CenterMask
    !cd {prj} && python setup.py build develop
"""
python setup.py build develop installs the packages such that you can edit the code without reinstalling those packages each time
"""
 import sys
 sys.path.append(prj)
 import time
 import glob
 import matplotlib
 import matplotlib.pylab as plt
 plt.rcParams["axes.grid"] = False
 #rcParams is used to change the default runtime configuration parameters
- Download pretrained model from the GitHub repository
 m_path = join(project_name, 'centermask-V2-99-FPN-ms-3x.pth')
 #model configuration path
 m_config_path = join(prj, 'configs/centermask/centermask_V_99_eSE_FPN_ms_2x.yaml')
 #if the path does not exist, download the V2-99-FPN modelmodel
 if not exists(m_path):
 """
 download a pretrained V2-99-FPN model Mask AP 40.2, Box AP 45.6 model (where ‘AP’ stands for Average Precision)
 """
   !wget -O {m_path} https://www.dropbox.com/s/99i7ydsz2ngrvu1/centermask-
   V2-99-FPN-ms-3x.pth?dl=1
- Evaluate the model on a custom image:
 #Download an image
 img_url = 'https://raw.githubusercontent.com/tugstugi/dl-colab-notebooks/master/resources/dog.jpg'
 #extract the image file name from the URL
 img_file = basename(img_url)
 #extension of the image path
 img_ext = splitext(img_file)[1][1:]
 #Create a directory to store the image
 img_dir = 'my_image'
 !mkdir -p {img_dir} && rm -rf {img_dir}/*
 !wget -q -O {img_dir}/{img_file} {img_url}
 #Plot the input image
 plt.figure(figsize=(15, 5))
 plt.imshow(matplotlib.image.imread(join(img_dir, img_file)))
Input image:

- Apply CenterMask technique on the input image
#Create a sub-directory to store the output image
!mkdir -p output && rm -rf output/*
#Apply the pretrained model
!python CenterMask/demo/centermask_demo.py --weights {m_path} --config-file {m_config_path} --conf_th 0.3 --input {img_dir} --output_dir output --display_text 1 --display_scores 1
"""
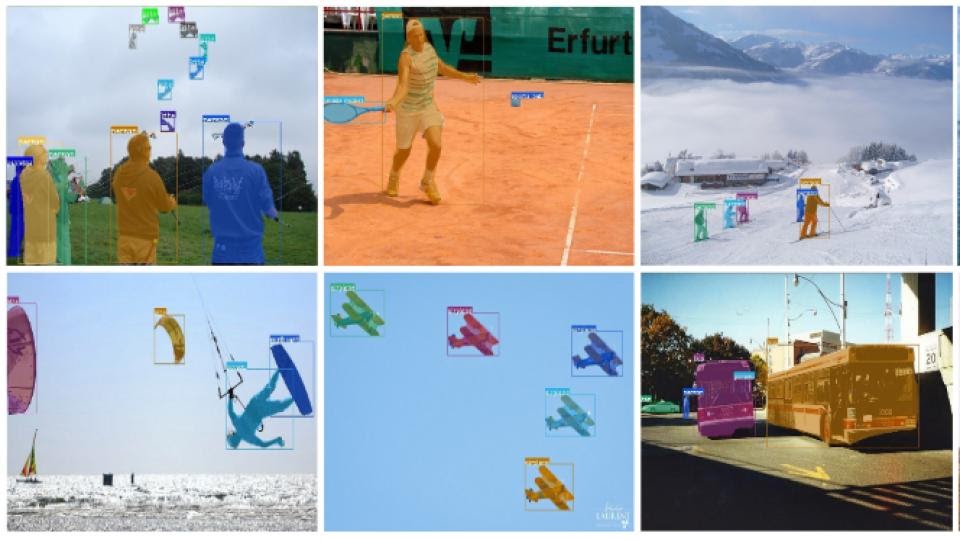
Input image will be fetched from ‘img_dir’ and output image will be stored in ‘output’ sub-directory; ‘display_text’ option will enable labeling of objects in the image and ‘display_scores’ option will display confidence scores for each object detected.
"""
Output:

- Google colab notebook of the above implementation
References
To gain an in-depth understanding of the CenterMask technique, refer to the following sources:
- Research paper
- GitHub repositories (repo1) (repo2)