Artificial Neural Networks have many popular variants that are applied in supervised and unsupervised learning problems. The Autoeconders are also a variant of neural networks that are mostly applied in unsupervised learning problems. When they come with multiple hidden layers in the architecture, they are referred to as the Deep Autoencoders. These models can be applied in a variety of applications including image reconstruction. In image reconstruction, they learn the representation of the input image pattern and reconstruct the new images matching to the original input image pattern. Image reconstruction has many important applications especially in the medical field where the decoded and noise-free images are required from the available incomplete or noisy images.
In this article, we will demonstrate the implementation of a Deep Autoencoder in PyTorch for reconstructing images. This deep learning model will be trained on the MNIST handwritten digits and it will reconstruct the digit images after learning the representation of the input images.
Autoencoder
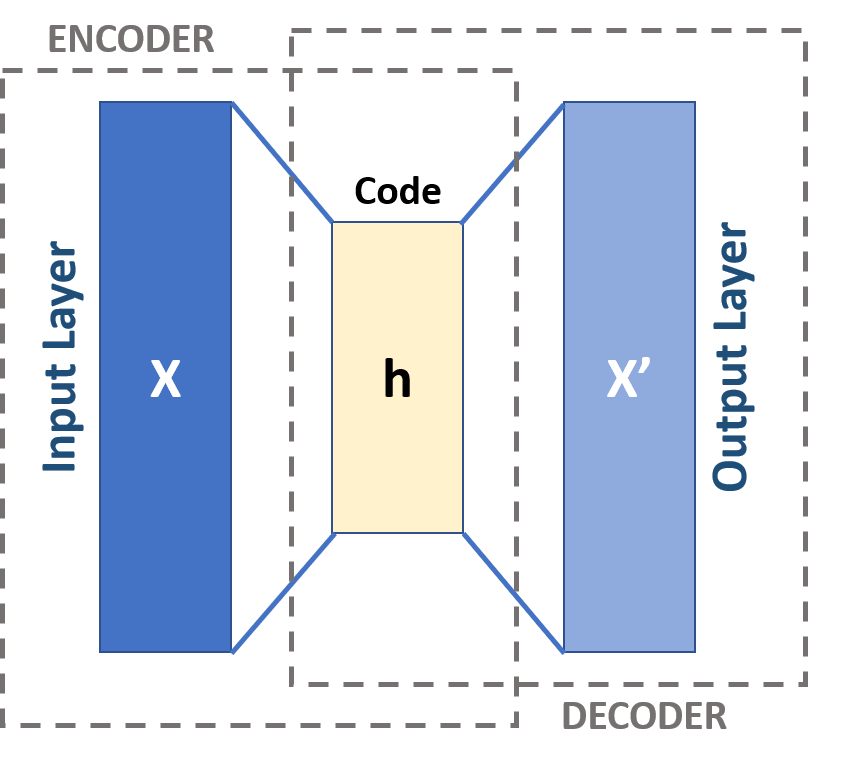
Autoencoders are the variants of Artificial Neural Networks which are generally used to learn the efficient data codings in an unsupervised manner. They usually learn in a representation learning scheme where they learn the encoding for a set of data. The network reconstructs the input data in a much similar way by learning its representation. The basic architecture of am Autoencoder is shown below.
(Image Source: Wikipedia)
The architecture generally comprises an input layer, an output layer and one or more hidden layers that connect input and output layers. The output layer has the same number of nodes as of input layers because of the purpose that it reconstructs the inputs. In its general form, there is only one hidden layer, but in case of deep autoencoders, there are multiple hidden layers. This increased depth reduces the computational cost of representing some functions and it decreases the amount of training data required to learn some functions. The popular applications of autoencoder include anomaly detection, image processing, information retrieval, drug discovery etc.
Implementing Deep Autoencoder in PyTorch
First of all, we will import all the required libraries.
import os
import torch
import torchvision
import torch.nn as nn
import torchvision.transforms as transforms
import torch.optim as optim
import matplotlib.pyplot as plt
import torch.nn.functional as F
from torchvision import datasets
from torch.utils.data import DataLoader
from torchvision.utils import save_image
from PIL import Image
Now, we will define the values for the hyperparameters.
Epochs = 100
Lr_Rate = 1e-3
Batch_Size = 128
The below function will be used for image transformation that is required for the PyTorch model.
transform = transforms.Compose([
    transforms.ToTensor(),
    transforms.Normalize((0.5,), (0.5,))
])
Using the below code snippet, we will download the MNIST handwritten digit dataset and get it ready for further processing.
train_set = datasets.MNIST(root='./data', train=True, download=True, transform=transform)
test_set = datasets.MNIST(root='./data', train=False, download=True, transform=transform)

train_loader = DataLoader(train_set, Batch_Size=Batch_Size, shuffle=True)
test_loader = DataLoader(test_set, Batch_Size=Batch_Size, shuffle=True)
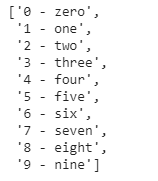
Let us see some information on the training data and its classes.
print(train_set)print(train_set.classes)
In the next step, we will define the Autoencoder class that will be used to define the main model.
class Autoencoder(nn.Module):
    def __init__(self):
        super(Autoencoder, self).__init__()

        #Encoder
        self.enc1 = nn.Linear(in_features=784, out_features=256) # Input image (28*28 = 784)
        self.enc2 = nn.Linear(in_features=256, out_features=128)
        self.enc3 = nn.Linear(in_features=128, out_features=64)
        self.enc4 = nn.Linear(in_features=64, out_features=32)
        self.enc5 = nn.Linear(in_features=32, out_features=16)

        #Decoder
        self.dec1 = nn.Linear(in_features=16, out_features=32)
        self.dec2 = nn.Linear(in_features=32, out_features=64)
        self.dec3 = nn.Linear(in_features=64, out_features=128)
        self.dec4 = nn.Linear(in_features=128, out_features=256)
        self.dec5 = nn.Linear(in_features=256, out_features=784) # Output image (28*28 = 784)

    def forward(self, x):
        x = F.relu(self.enc1(x))
        x = F.relu(self.enc2(x))
        x = F.relu(self.enc3(x))
        x = F.relu(self.enc4(x))
        x = F.relu(self.enc5(x))

        x = F.relu(self.dec1(x))
        x = F.relu(self.dec2(x))
        x = F.relu(self.dec3(x))
        x = F.relu(self.dec4(x))
        x = F.relu(self.dec5(x))

        return x
Now, we will create the Autoencoder model as an object of the Autoencoder class that we have defined above.
model = Autoencoder()
print(model)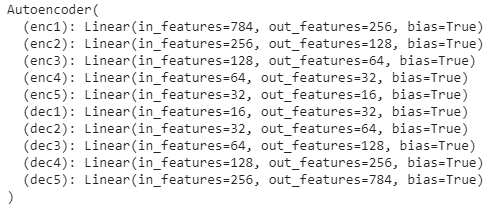
Now, the loss criteria and the optimization methods will be defined.
criterion = nn.MSELoss()
optimizer = optim.Adam(net.parameters(), lr=Lr_Rate)
The below function will enable the CUDA environment.
def get_device():
    if torch.cuda.is_available():
        device = 'cuda:0'
    else:
        device = 'cpu'
    return device
The below function will create a directory to save the results.
def make_dir():
    image_dir = 'MNIST_Out_Images'
    if not os.path.exists(image_dir):
        os.makedirs(image_dir)
Using the below function, we will save the reconstructed images as generated by the model.
def save_decod_img(img, epoch):
    img = img.view(img.size(0), 1, 28, 28)
    save_image(img, './MNIST_Out_Images/Autoencoder_image{}.png'.format(epoch))
The below function will be called to train the model.
def training(model, train_loader, Epochs):
    train_loss = []
    for epoch in range(Epochs):
        running_loss = 0.0
        for data in train_loader:
            img, _ = data
            img = img.to(device)
            img = img.view(img.size(0), -1)
            optimizer.zero_grad()
            outputs = model(img)
            loss = criterion(outputs, img)
            loss.backward()
            optimizer.step()
            running_loss += loss.item()

        loss = running_loss / len(train_loader)
        train_loss.append(loss)
        print('Epoch {} of {}, Train Loss: {:.3f}'.format(
            epoch+1, Epochs, loss))

        if epoch % 5 == 0:
            save_decod_img(outputs.cpu().data, epoch)

    return train_loss
The below function will test the trained model on image reconstruction.
def test_image_reconstruct(model, test_loader):
     for batch in test_loader:
        img, _ = batch
        img = img.to(device)
        img = img.view(img.size(0), -1)
        outputs = model(img)
        outputs = outputs.view(outputs.size(0), 1, 28, 28).cpu().data
        save_image(outputs, 'MNIST_reconstruction.png')
        break
Before training, the model will be pushed to the CUDA environment and the directory will be created to save the result images using the functions defined above.
device = get_device()
model.to(device)
make_dir()
Now, the training of the model will be performed.
train_loss = training(model, train_loader, Epochs)
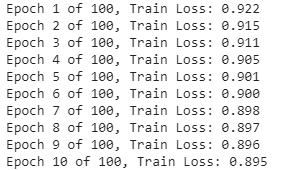

After successful training, we will visualize the loss during training.
plt.figure()
plt.plot(train_loss)
plt.title('Train Loss')
plt.xlabel('Epochs')
plt.ylabel('Loss')
plt.savefig('deep_ae_mnist_loss.png')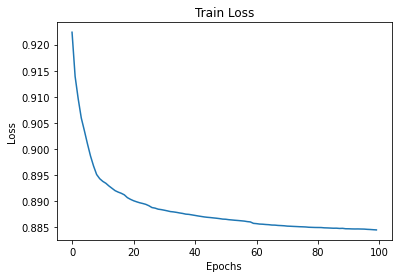
We will visualize several images that are saved during training.
Image.open('/content/MNIST_Out_Images/Autoencoder_image0.png')Image.open('/content/MNIST_Out_Images/Autoencoder_image50.png')
Image.open('/content/MNIST_Out_Images/Autoencoder_image95.png')

In the last step, we will test our autoencoder model to reconstruct the images.
test_image_reconstruct(model, testloader)


Image.open('/content/MNIST_reconstruction.png')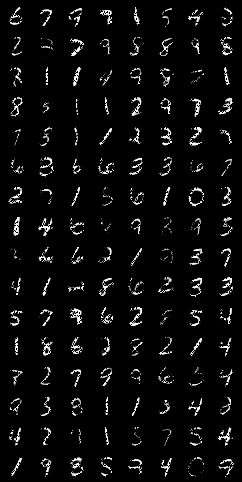
So, as we could see that the autoencoder model started reconstructing the images since the start of the training process. After the first epoch, this reconstruction was not proper and was improved until the 50th epochs. After the complete training, as we can see in the image generated after the 95th epoch and on testing, it can construct the images very well matching to the original input images. Further, it opens a scope to train the model for more number of epochs as 100 or 200 because we have seen a heavy loss during training that was getting decreased epoch by epoch. After a long training, it is expected to obtain more clear reconstructed images. However, we could understand using this demonstration how to implement deep autoencoders in PyTorch for image reconstruction.
References:-


