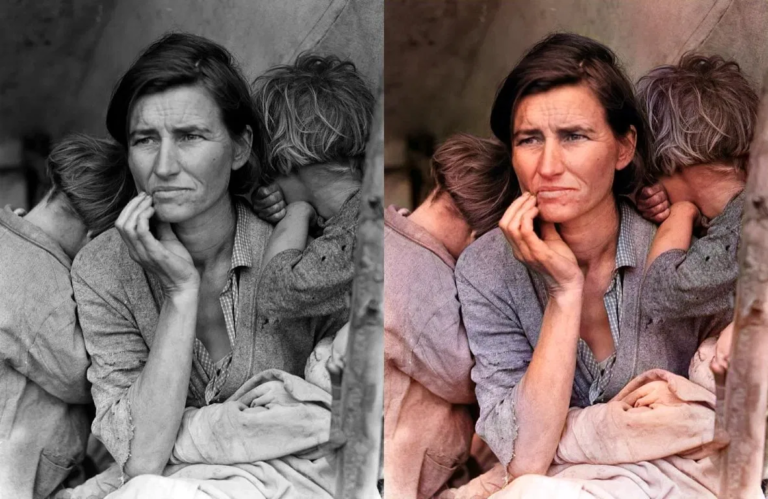
DeOldify is a Black and White image Colorizing library created by Jason Antic. Mainly, this library utilized the techniques of these two papers: Self-Attention Generative Adversarial Network and Two Time-Scale Update Rule. Also, DeOldify introduced the NoGAN technique to solve some of the key problems to make hyper-realistic colorization images and video, and we will see everything in our further article section with python code implementation of coloring black and white images and videos with different models.
Some of the new feature of the DeOldify project:
- Video Glitch elimination
- More accurate skin tone
- Less biasing for Blue color
- NoGAN- a new effective technique for Image to Image GAN(Generative Adversarial Network) training
- More Highly detailed and hyper-realistic outputs.
They have made a public Web API for non-coders for simply coloring their images using the Drag and Drop method, below is an example of their free website API, which include sufficient accuracy with fewer details.
DeOldify Image Colorization on DeepAI: https://deepai.org/machine-learning-model/colorizer

An Advance paid version of DeOldify is available here, and you can see the difference between the previous output and this one. Clearly, it shows more saturation and highlight in our test image.
MyHeritage In Color: https://www.myheritage.com/incolor

NoGAN
I haven’t been entirely rigorous in figuring out what all is going on in NoGAN- I’ll save that for a paper.
-Jason
It is not officially papered, and the technique itself is a BlackBox according to Jason, his best guess is NoGAN provides minimal time on GAN training with wonderful colorization, which in case of GAN training will take days.
DeOldify Models
DeOldify provides three primary models for different use case. Each of these has some limitations and benefit:
- Artistic Model
This model achieves vibrant color and detailed images, but you have to adjust the parameters a lot to get the best results. You have to adjust the rendering resolution and factors to get the most accurate colorize image.
The model uses a resnet34 backbone on a UNet with an emphasis on the depth of layers on the decoder side. And it is trained on five critic pretrain/GAN cycle repeats via NoGAN.
- Stable Model
This model archives the best results in portraits and landscapes. It makes sure nothing got too much colored and makes the most part of the image remain gray like faces and limbs. It is less hyper-realistic but it makes sure nothing looks more colored.
It uses a resnet101 backbone on a UNet with an emphasis on the width of layers on the decoder side.
- Video Model
As the name suggests, it is a model used to color the videos and we are going to see each of these models working in a python environment. It gives smooth, consistent, and flicker-free Video. This model is the same as a stable model in the case of architecture but different in training. DeOldify is trained on 2.2% of Imagenet dataset once at 192px, using only the initial generator/critic pretrain/GAN NoGAN training.
Implementation
Hardware and OS(Operating System) Requirements:
- It is trained on GeForce 1080TI (11GB).
- 4GB+ GPU should be sufficient
- Ubuntu 18.04
- Windows is not supported for now.
Don’t worry, we are going to use Google Colab for the whole tutorial and will take the pre-trained models to get this demonstration completed in one article.
Installation
First, we are going to clone the repository and will install the dependencies from the requirements file. I have made some changes in the official repository by adding test images, if you are interested in an official build, then clone from original source:
https://github.com/jantic/DeOldify
Else, use the below commands to install DeOldify:
!git clone https://github.com/mmaithani/DeOldify.git DeOldify
## uncomment below command for official repo cloning
# !git clone https://github.com/jantic/DeOldify.git DeOldify
cd DeOldify
!pip install -r colab_requirements.txt
Importing Modules and Deoldify utilities
from deoldify import device
from deoldify.device_id import DeviceId
#choices:  CPU, GPU0...GPU7
device.set(device=DeviceId.GPU0)

import torch
if not torch.cuda.is_available():
    print('GPU not available.')
import fastai
from deoldify.visualize import *
import warnings
warnings.filterwarnings("ignore", category=UserWarning, message=".*?Your .*? set is empty.*?")
Download pretrained DeOldify models
!mkdir 'models'
!wget https://data.deepai.org/deoldify/ColorizeArtistic_gen.pth -O ./models/ColorizeArtistic_gen.pth
# additional watermarks if needed(optional step)
!wget https://media.githubusercontent.com/media/jantic/DeOldify/master/resource_images/watermark.png -O ./resource_images/watermark.png
Initialize DeOldify Artistic Model
colorizer = get_image_colorizer(artistic=True)
Testing
source_url = 'https://images.pexels.com/photos/3031397/pexels-photo-3031397.jpeg'
render_factor = 35
watermarked = True
image_path = colorizer.plot_transformed_image_from_url(url=source_url, render_factor=render_factor, compare=True, watermarked=watermarked)

show_image_in_notebook(image_path)

Testing some local images

for i in range(10,40,2):
    colorizer.plot_transformed_image('/content/DeOldify/test_images/black-and-white-landscapes.jpg', render_factor=i, display_render_factor=True, figsize=(8,8))
url="/content/DeOldify/test_images/68747470733a2f2f692e696d6775722e636f6d2f427430766e6b652e6a7067 (2).jpg" #@param {type:"string"}
for i in range(10,40,2):
    colorizer.plot_transformed_image('/content/DeOldify/test_images/68747470733a2f2f692e696d6775722e636f6d2f427430766e6b652e6a7067 (2).jpg', render_factor=i, display_render_factor=True, figsize=(8,8))
Colorizing videos using DeOldify
It pretty simple you need to download pretrained models and initiate a video object:
Download Video Colorizing model of Deoldify
!wget https://data.deepai.org/deoldify/ColorizeVideo_gen.pth -O ./models/ColorizeVideo_gen.pth
Initialize video object
colorizer = get_video_colorizer()
Testing (Coloring a Charlie Chaplin Black and White Movie)
Before showing the result let us understand what it will do it will colorize every single frame of a youtube video and then it will merge them into one final colorize movie:

source_url = 'https://www.youtube.com/watch?v=zqqQxUS3GwE' render_factor = 21
watermarked = True
video_path = colorizer.colorize_from_url(source_url, 'video.mp4', render_factor, watermarked=watermarked)
    show_video_in_notebook(video_path)

Output Video:
Wrapping Up
We have an enormously powerful tool that has the ability to really matching the most accurate color to your grayscale photo, and sometimes it even fails human eyes with such hyper-realistic outputs, you can learn more about colorizing a video, GIF, or making new changes to techniques the steps are similar, for more resources checkout below references: