The Autoencoders, a variant of the artificial neural networks, are applied very successfully in the image process especially to reconstruct the images. The image reconstruction aims at generating a new set of images similar to the original input images. This helps in obtaining the noise-free or complete images if given a set of noisy or incomplete images respectively. In our last article, we demonstrated the implementation of Deep Autoencoder in image reconstruction.
In this article, we will define a Convolutional Autoencoder in PyTorch and train it on the CIFAR-10 dataset in the CUDA environment to create reconstructed images.
Convolutional Autoencoder
Convolutional Autoencoder is a variant of Convolutional Neural Networks that are used as the tools for unsupervised learning of convolution filters. They are generally applied in the task of image reconstruction to minimize reconstruction errors by learning the optimal filters. Once they are trained in this task, they can be applied to any input in order to extract features. Convolutional Autoencoders are general-purpose feature extractors differently from general autoencoders that completely ignore the 2D image structure. In autoencoders, the image must be unrolled into a single vector and the network must be built following the constraint on the number of inputs.
The block diagram of a Convolutional Autoencoder is given in the below figure.

Implementing in PyTorch
First of all, we will import the required libraries.
import numpy as np
import torch
import torch.nn as nn
import torch.nn.functional as F
import torch.optim as optim
import matplotlib.pyplot as plt
from torch.utils.data.sampler import SubsetRandomSampler
from torch.utils.data import DataLoader
from torchvision import datasets, transforms
import matplotlib.pyplot as plt
%matplotlib inline
import torch.nn as nn
import torch.nn.functional as F
After importing the libraries, we will download the CIFAR-10 dataset.
#Converting data to torch.FloatTensor
transform = transforms.ToTensor()

# Download the training and test datasets
train_data = datasets.CIFAR10(root='data', train=True, download=True, transform=transform)

test_data = datasets.CIFAR10(root='data', train=False, download=True, transform=transform)
Now, we will prepare the data loaders that will be used for training and testing.
#Prepare data loaders
train_loader = torch.utils.data.DataLoader(train_data, batch_size=32, num_workers=0)
test_loader = torch.utils.data.DataLoader(test_data, batch_size=32, num_workers=0)
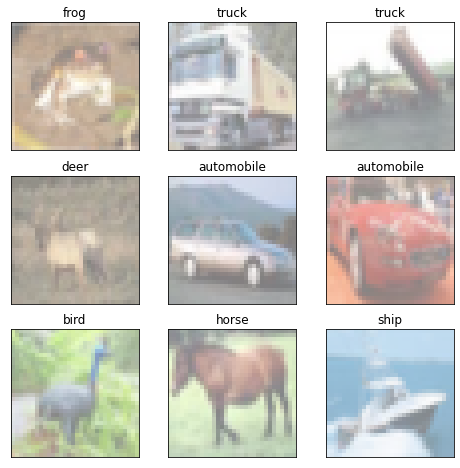
We will print some random images from the training data set.
#Utility functions to un-normalize and display an image
def imshow(img):
    img = img / 2 + 0.5
    plt.imshow(np.transpose(img, (1, 2, 0)))


#Define the image classes
classes = ['airplane', 'automobile', 'bird', 'cat', 'deer', 'dog', 'frog', 'horse', 'ship', 'truck']

#Obtain one batch of training images
dataiter = iter(train_loader)
images, labels = dataiter.next()
images = images.numpy() # convert images to numpy for display

#Plot the images
fig = plt.figure(figsize=(8, 8))
# display 20 images
for idx in np.arange(9):
    ax = fig.add_subplot(3, 3, idx+1, xticks=[], yticks=[])
    imshow(images[idx])
    ax.set_title(classes[labels[idx]])
In the next step, we will define the Convolutional Autoencoder as a class that will be used to define the final Convolutional Autoencoder model.
#Define the Convolutional Autoencoder
class ConvAutoencoder(nn.Module):
    def __init__(self):
        super(ConvAutoencoder, self).__init__()

        #Encoder
        self.conv1 = nn.Conv2d(3, 16, 3, padding=1)
        self.conv2 = nn.Conv2d(16, 4, 3, padding=1)
        self.pool = nn.MaxPool2d(2, 2)

        #Decoder
        self.t_conv1 = nn.ConvTranspose2d(4, 16, 2, stride=2)
        self.t_conv2 = nn.ConvTranspose2d(16, 3, 2, stride=2)


    def forward(self, x):
        x = F.relu(self.conv1(x))
        x = self.pool(x)
        x = F.relu(self.conv2(x))
        x = self.pool(x)
        x = F.relu(self.t_conv1(x))
        x = F.sigmoid(self.t_conv2(x))

        return x


#Instantiate the model
model = ConvAutoencoder()
print(model)
After that, we will define the loss criterion and optimizer.
#Loss function
criterion = nn.BCELoss()

#Optimizer
optimizer = torch.optim.Adam(model.parameters(), lr=0.001)
Now, we will pass our model to the CUDA environment. Make sure that you are using GPU.
def get_device():
    if torch.cuda.is_available():
        device = 'cuda:0'
    else:
        device = 'cpu'
    return device

device = get_device()
print(device)
model.to(device)
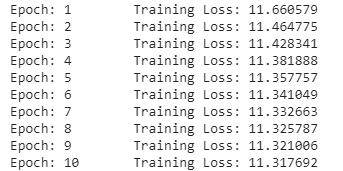
In the next step, we will train the model on CIFAR10 dataset.
#Epochs
n_epochs = 100

for epoch in range(1, n_epochs+1):
    # monitor training loss
    train_loss = 0.0

    #Training
    for data in train_loader:
        images, _ = data
        images = images.to(device)
        optimizer.zero_grad()
        outputs = model(images)
        loss = criterion(outputs, images)
        loss.backward()
        optimizer.step()
        train_loss += loss.item()*images.size(0)

    train_loss = train_loss/len(train_loader)
    print('Epoch: {} \tTraining Loss: {:.6f}'.format(epoch, train_loss))

Finally, we will train the convolutional autoencoder model on generating the reconstructed images.
#Batch of test images
dataiter = iter(test_loader)
images, labels = dataiter.next()

#Sample outputs
output = model(images)
images = images.numpy()

output = output.view(batch_size, 3, 32, 32)
output = output.detach().numpy()

#Original Images
print("Original Images")
fig, axes = plt.subplots(nrows=1, ncols=5, sharex=True, sharey=True, figsize=(12,4))
for idx in np.arange(5):
    ax = fig.add_subplot(1, 5, idx+1, xticks=[], yticks=[])
    imshow(images[idx])
    ax.set_title(classes[labels[idx]])
plt.show()

#Reconstructed Images
print('Reconstructed Images')
fig, axes = plt.subplots(nrows=1, ncols=5, sharex=True, sharey=True, figsize=(12,4))
for idx in np.arange(5):
    ax = fig.add_subplot(1, 5, idx+1, xticks=[], yticks=[])
    imshow(output[idx])
    ax.set_title(classes[labels[idx]])
plt.show()
So, as we can see above, the convolutional autoencoder has generated the reconstructed images corresponding to the input images. The training of the model can be performed more longer say 200 epochs to generate more clear reconstructed images in the output. However, we could now understand how the Convolutional Autoencoder can be implemented in PyTorch with CUDA environment.


