
Simple Neural Network is feed-forward wherein info information ventures just in one direction.i.e. the information passes from input layers to hidden layers finally to the output layers. Recurrent Neural Network is the advanced type to the traditional Neural Network. It makes use of sequential information. Unlike conventional networks, the output and input layers are dependent on each other. RNNs are called recurrent because they play out a similar undertaking for each component of an arrangement, with the yield being relied upon the past calculations.LSTM or Long Short Term Memory are a type of RNNs that is useful in learning order dependence in sequence prediction problems.
In this article, we will cover a simple Long Short Term Memory autoencoder with the help of Keras and python.
What is an LSTM autoencoder?
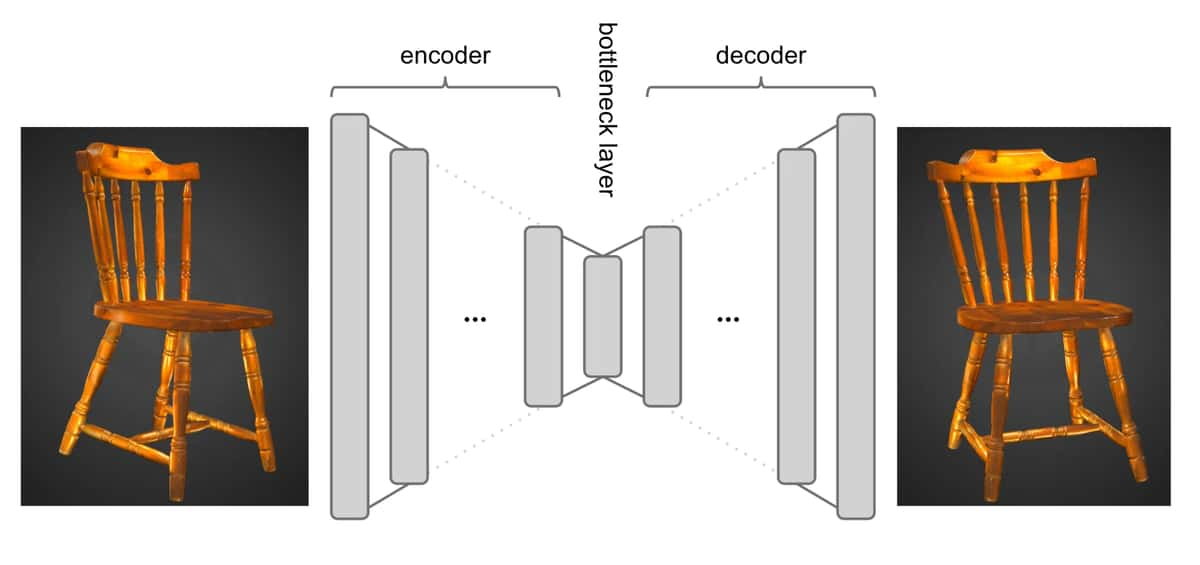
LSTM autoencoder is an encoder that makes use of LSTM encoder-decoder architecture to compress data using an encoder and decode it to retain original structure using a decoder.

About the dataset
The dataset can be downloaded from the following link. It gives the daily closing price of the S&P index.
Code Implementation With Keras
Import libraries required for this project
import numpy as np
import pandas as pd
import matplotlib as mpl
import matplotlib.pyplot as plt
Read the data
df = pd.read_csv('spx.csv', parse_dates=['date'], index_col='date')
Split the data
train_size = int(len(df) * 0.9)
test_size = len(df) - train_size
train, test = df.iloc[0:train_size], df.iloc[train_size:len(df)]
train.shape

Pre-Processing of Data
We need to pre-process the training and test data using the standardscaler library imported from sklearn.
from sklearn.preprocessing import StandardScaler
scaler = StandardScaler()
scaler = scaler.fit(train[['close']])
train['close'] = scaler.transform(train[['close']])
test['close'] = scaler.transform(test[['close']])
Create a sequence with historical data
Now we will split the time series data into subsequences and create a sequence of 30 days of historical data.
def create_dataset(X, y, time_steps=1):
    X1, y1 = [], []
    for i in range(len(X) - time_steps):
        t = X.iloc[i:(i + time_steps)].values
        X1.append(t)
        y1.append(y.iloc[i + time_steps])
    return np.array(X1), np.array(y1)
TIME_STEPS = 30
X_train, y_train = create_dataset(
  train[['close']],
  train.close,
  TIME_STEPS
)
X_test, y_test = create_dataset(
  test[['close']],
  test.close,
  TIME_STEPS
)
print(X_train.shape)

Creating an LSTM Autoencoder Network
The architecture will produce the same sequence as given as input. It will take the sequence data. The dropout removes inputs to a layer to reduce overfitting. Adding RepeatVector to the layer means it repeats the input n number of times. The TimeDistibuted layer takes the information from the previous layer and creates a vector with a length of the output layers.
import keras
model = keras.Sequential()
model.add(keras.layers.LSTM(
    units=64,
    input_shape=(X_train.shape[1], X_train.shape[2])
))
model.add(keras.layers.Dropout(rate=0.2))
model.add(keras.layers.RepeatVector(n=X_train.shape[1]))
model.add(keras.layers.LSTM(units=64, return_sequences=True))
model.add(keras.layers.Dropout(rate=0.2))
model.add(
  keras.layers.TimeDistributed(
    keras.layers.Dense(units=X_train.shape[2])
  )
)
model.compile(loss='mae', optimizer='adam')
model.summary()

Fitting the Model
Here, we train the model with epoch:20 and batch size 32.
history = model.fit(
    X_train, y_train,
    epochs=20,
    batch_size=32,
    validation_split=0.1,
    shuffle=False
)

Evaluation
plt.plot(history.history['loss'], label='train')
plt.plot(history.history['val_loss'], label='test')
plt.legend();

From the above plot we can see the training and test error is decreasing. For better result, we can train the model with more epochs.
Actual Value of Test Data
y_test

Prediction on Test Data
pred = model.predict(X_test, verbose=0)

Conclusion
In this article, we have covered the basics of Long-short Term Memory autoencoder by using Keras library. Comparing the prediction result and the actual value we can tell our model performs decently. Further, we can tune this model by increasing the epochs to get better results.The complete code of the above implementation is available at the AIM’s GitHub repository. Please visit this link to find the notebook of this code.
- From Humanoid Robots to Telecom Trials, 12 Major Announcements at NVIDIA GTC Berlin 2026
- Anyone Can Make a Robot Move, Few Can Make It Stop
- After ISRO’s PSLV Failure, TakeMe2Space Looks to SpaceX for Reliable Launch
- Why AI Agents are the Next Frontier in Quantum Security
- Physical AI Squeezes Labour Market, And Low-Skilled Immigrant Jobs May Be First to Fall
- Rocket Math Isn’t Mathing: Why India’s Space Launches are Expensive