


Computer vision (CV) is the field of study that helps computers to study using different techniques and methods so that it can capture what exists in an image or a video. There are a large number of applications of computer vision that are present today like facial recognition, driverless cars, medical diagnostics, etc. We will discuss one of the interesting applications of CV that is Emotion Detection through facial expressions. CV can recognize and tell you what your emotion is by just looking at your facial expressions. It can detect whether you are angry, happy, sad, etc.
The article demonstrates a computer vision model that we will build using Keras and VGG16 – a variant of Convolutional Neural Network. We will use this model to check the emotions in real-time using OpenCV and webcam. We will be working with Google Colab to build the model as it gives us the GPU and TPU. You can use any other IDE as well.
What is there in this article?
- Downloading the data
- Building the VGG Model for emotion detection
- Training of the VGG model efficiently so that it can recognize the emotion
- Testing of the model in real-time using webcam
The Dataset
The name of the data set is fer2013 which is an open-source data set that was made publicly available for a Kaggle competition. It contains 48 X 48-pixel grayscale images of the face. There are seven categories (0=Angry, 1=Disgust, 2=Fear, 3=Happy, 4=Sad, 5=Surprise, 6=Neutral) present in the data. The CSV file contains two columns that are emotion that contains numeric code from 0-6 and a pixel column that includes a string surrounded in quotes for each image.
Implementing VGG16 Network for Classification of Emotions with GPU
First, we need to enable GPU in the Google Colab to get fast processing. We can enable it by going to ‘Runtime’ in Google Colab and then clicking on ‘Change runtime type’ and select GPU. Once it is enabled we will now import the required libraries for building the network. The code for importing the libraries is given below.
import pandas as pd
import numpy as np
from keras.models import Sequential
from keras.layers.core import Flatten, Dense, Dropout
from keras.layers.convolutional import Convolution2D, MaxPooling2D, ZeroPadding2D
from keras.optimizers import SGD
import cv2
We have now imported all the libraries and now we will import the data set. I have already saved it in my drive so I will read it from there. You can give directory in round brackets where your data is stored as shown in the code below. After importing we have printed the data frame as shown in the image.
emotion_data = pd.read_csv('/content/drive/My Drive/Emotion_Detection /fer2013.csv')
print('emotion_data')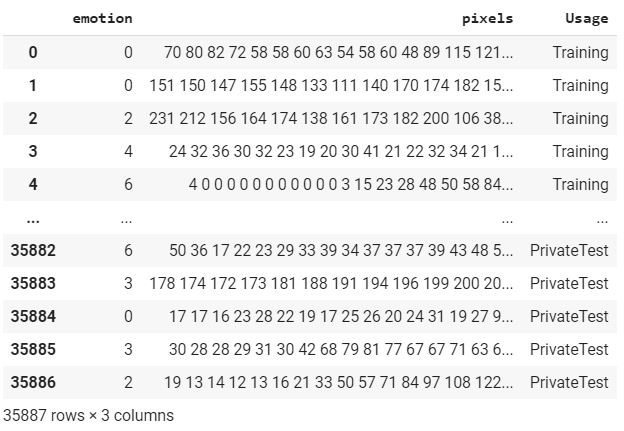
View of the data frame
We then create different lists of storing the testing and training image pixels. After this, we check if the pixel belongs to training then we append it into the training list & training labels. Similarly, for pixels belonging to the Public test, we append it to testing lists. The code for the same is shown below.
X_train = []
y_train = []
X_test = []
y_test = []
for index, row in emotion_data.iterrows():
    k = row['pixels'].split(" ")
    if row['Usage'] == 'Training':
        X_train.append(np.array(k)
        y_train.append(row['emotion'])
    elif row['Usage'] == 'PublicTest':
        X_test.append(np.array(k))
        y_test.append(row['emotion'])
Once we have added the pixel to the lists then we convert them into NumPy arrays and reshape X_train, X_test. After doing this we convert the training labels and testing labels into categorical ones. The code of the same is given below.
X_train = np.array(X_train')
y_train = np.array(y_train)
X_test = np.array(X_test)
y_test = np.array(y_test)

X_train = X_train.reshape(X_train.shape[0], 48, 48, 1)
X_test = X_test.reshape(X_test.shape[0], 48, 48, 1)

y_train= np_utils.to_categorical(y_train, num_classes=7)
y_test = np_utils.to_categorical(y_test, num_classes=7)
VGG16 Model for Emotion Detection
Now it’s time to design the CNN model for emotion detection with different layers. We start with the initialization of the model followed by batch normalization layer and then different convents layers with ReLu as an activation function, max pool layers, and dropouts to do learning efficiently. You can also change the architecture by initiating the layers of your choices with different numbers of neurons and activation functions.
model = Sequential()
model.add(ZeroPadding2D((1,1),input_shape=(48,48,1)))
model.add(Convolution2D(64, 3, 3, activation='relu'))
model.add(ZeroPadding2D((1,1)))
model.add(Convolution2D(64, 3, 3, activation='relu'))
model.add(MaxPooling2D((2,2), strides=(2,2)))

model.add(ZeroPadding2D((1,1)))
model.add(Convolution2D(128, 3, 3, activation='relu'))
model.add(ZeroPadding2D((1,1)))
model.add(Convolution2D(128, 3, 3, activation='relu'))
model.add(MaxPooling2D((2,2), strides=(2,2)))

model.add(ZeroPadding2D((1,1)))
model.add(Convolution2D(256, 3, 3, activation='relu'))
model.add(ZeroPadding2D((1,1)))
model.add(Convolution2D(256, 3, 3, activation='relu'))
model.add(ZeroPadding2D((1,1)))
model.add(Convolution2D(256, 3, 3, activation='relu'))
model.add(MaxPooling2D((2,2), strides=(2,2)))

model.add(ZeroPadding2D((1,1)))
model.add(Convolution2D(512, 3, 3, activation='relu'))
model.add(ZeroPadding2D((1,1)))
model.add(Convolution2D(512, 3, 3, activation='relu'))
model.add(ZeroPadding2D((1,1)))
model.add(Convolution2D(512, 3, 3, activation='relu'))
model.add(MaxPooling2D((2,2), strides=(2,2)))


model.add(ZeroPadding2D((1,1)))
model.add(Convolution2D(512, 3, 3, activation='relu'))
model.add(ZeroPadding2D((1,1)))
model.add(Convolution2D(512, 3, 3, activation='relu'))
model.add(ZeroPadding2D((1,1)))
model.add(Convolution2D(512, 3, 3, activation='relu'))
model.add(MaxPooling2D((2,2), strides=(2,2)))

model.add(Flatten())
model.add(Dense(4096, activation='relu'))
model.add(Dropout(0.5))
model.add(Dense(4096, activation='relu'))
model.add(Dropout(0.5))
model.add(Dense(7, activation='softmax'))
After this, we compile the model using Adam as an optimizer, loss as categorical cross-entropy, and metrics as accuracy as shown in the below code.
model.compile(optimizer='sgd',loss='categorical_crossentropy',metrics=['accuracy'])
After compiling the model we then fit the data for training and validation. Here, we are taking the batch size to be 32 with 30 epochs. You can tune them according to your wish.
model.fit(X_train,train_y,batch_size=32,epochs=30,verbose=1,validation_data=(X_test, test_y))
Training of the Network
Once the training has been done we can evaluate the model and compute loss and accuracy using the below code.
loss_and_metrics = model.evaluate(X_test,y_test)
print(loss_and_metrics)
We now serialize the model to JSON and save the model weights in an hd5 file so that we can make use of this file to make predictions rather than training the network again. You can do this task by using the below code.
model_json = model.to_json()
with open("model.json", "w") as json_file:
json_file.write(model_json)
model.save_weights("model.h5")
print("Saved model to disk")
Testing the model in Real-time using OpenCV and WebCam
Now we will test the model that we build for emotion detection in real-time using OpenCV and webcam. To do so we will write a python script. We will use the Jupyter notebook in our local system to make use of a webcam. You can use other IDEs as well. First, we will install a few libraries that are required. Use the below code to import those all.
import os
import cv2
import numpy as np
from keras.models import model_from_json
from keras.preprocessing import image
After importing all the required libraries we will load the model weights that we saved earlier after training. Use the below code to load your saved model. After importing the model weights we have imported a haar cascade file that is designed by open cv to detect the frontal face.
model = model_from_json(open("model.json", "r").read())
model.load_weights('model.h5')
face_haar_cascade = cv2.CascadeClassifier('haarcascade_frontalface_default.xml')
After importing the haar cascade file we will have written a code to detect faces and classify the desired emotions. We have assigned the labels that will be different emotions like angry, happy, sad, surprise, neutral. As soon as you run the code a new window will pop up and your webcam will turn on. It will then detect the face of the person, draw a bounding box over the detected person, and then convert the RGB image into grayscale & classify it in real-time. Please refer to the below code for the same and sample outputs that are shown in the images. To stop the code you need to press ‘b’.
cap=cv2.VideoCapture(0)

while True:
    image=cap.read()

    coverted_image= cv2.cvtColor(test_image, cv2.COLOR_BGR2GRAY)


    faces_detected = face_haar_cascade.detectMultiScale(converted_image)
    for (x,y,w,h) in faces_detected:
    cv2.rectangle(test_image,(x,y), (x+w,y+h), (255,0,0))
    roi_gray=gray_image[y:y+w,x:x+h]
    roi_gray=cv2.resize(roi_gray,(48,48))
    image_pixels = image.image_to_array(roi_gray)
    image_pixels = np.expand_dims(image_pixels, axis = 0)
    image_pixels /= 255


    predictions = model.predict(image_pixels)
    max_index = np.argmax(predictions[0])

    emotion_detection = ('angry', 'disgust', 'fear', 'happy', 'sad', 'surprise', 'neutral')
    emotion_prediction = emotion_detection[max_index]


    cv2.putText(test_image, emotion_prediction, (int(x), int(y))
     cv2.putText(frame,label,label_position,cv2.FONT_HERSHEY_SIMPLEX,2,(0,255,0),3)


    resize_image = cv2.resize(image, (1000, 700))
    cv2.imshow('Emotion',resized_image)
    if cv2.waitKey(10) == ord('b')
        break


cap.release()
cv2.destroyAllWindows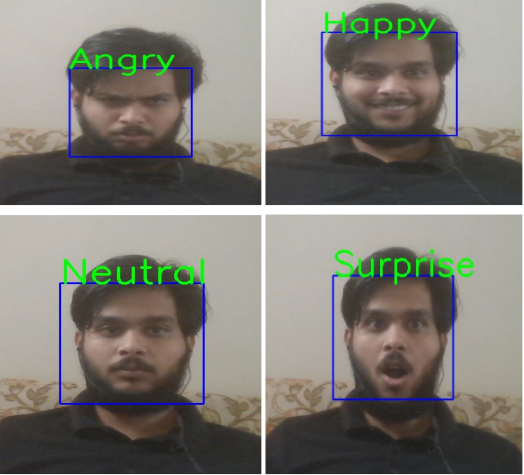
Conclusion
I conclude the article by hoping that you got a fair idea and understood the whole pipeline on how you can make an emotion detection model using pre-trained architecture like VGG16. We initially defined network and trained it so that it is capable of classifying the correct emotion and then we made use of that trained model to classify the emotions in real-time. The model does not give good accuracy and takes much time to train. You can make use of other pre-trained architecture like ResNet and MobileNet to train your network for better performance of the model.
With rapid advancements in Artificial intelligence, the use cases and applications you can build using AI are increasing rapidly. You can always think of what use cases you can build after reading an article like this using the power of CNN. One more such interesting article you can check on “My First Kaggle problem with CNN Model – To Count Fingers And Distinguish Between Left And Right Hand”.