Generative Adversarial Networks (GANs) are a trend nowadays in various unsupervised learning applications. They are applied in animation and gaming with a full swing due to their capability to produce new images when trained on a set of similar but different images. This model is basically a deep generative model composed of two networks – a generator and a discriminator. The Deep Convolutional Neural Network is one of the variants of GAN where convolutional layers are added to the generator and discriminator networks.
In this article, we will train the Deep Convolutional Generative Adversarial Network on Fashion MNIST training images in order to generate a new set of fashion apparel images. This model was proposed by Radford, Metz and Chintala in their research paper. This model uses a generator and a discriminator. The generator generates an image during the training and the discriminator identifies whether the image generated by the generator is real or fake.
The Dataset
We will use the Fashion MNIST dataset that is publicly available at the TensorFlow website. It consists of a training set of 60,000 example images and a test set of 10,000 example images. Each image in the dataset has the size 28 x 28 pixels. Each training and test image belongs to one of the classes including T_shirt/top, Trouser, Pullover, Dress, Coat, Sandal, Shirt, Sneaker, Bag, and Ankle boot.
Implementation of Deep Convolutional GAN
In the first step, we will import the required libraries. ‘imageio’ is used for generating GIFs. This execution was done in Google Colab. If you are using any other platform, make sure to install the libraries if the installation is required.
import tensorflow as tf
import glob
import imageio
import matplotlib.pyplot as plt
import numpy as np
import os
import PIL
from tensorflow.keras import layers
import time
Loading the Data set
After successfully importing the libraries, we will load the Fashion MNIST data set from TensorFlow. This dataset will be used to train the generator and discriminator of GAN model.
(train_images, train_labels), (_, _) = tf.keras.datasets.fashion_mnist.load_data()
After loading the dataset, it will be reshaped according to the training requirements.
train_images = train_images.reshape(train_images.shape[0], 28, 28, 1).astype('float32')
train_images = (train_images - 127.5) / 127.5 # Normalize the images to [-1, 1]
The training images will be shuffled in a batch of 256 using the below lines of codes.
BUFFER_SIZE = 60000
BATCH_SIZE = 256

train_dataset = tf.data.Dataset.from_tensor_slices(train_images).shuffle(BUFFER_SIZE).batch(BATCH_SIZE)
Creating the Deep Convolutional GAN Model
In order to create the GAN model, first, we will define a function for the generator and then for the discriminator.
#Function for Generator of GAN
def make_generator_model():
    model = tf.keras.Sequential()
    model.add(layers.Dense(7*7*256, use_bias=False, input_shape=(100,)))
    model.add(layers.BatchNormalization())
    model.add(layers.LeakyReLU())

    model.add(layers.Reshape((7, 7, 256)))
    assert model.output_shape == (None, 7, 7, 256) # Note: None is the batch size

    model.add(layers.Conv2DTranspose(128, (5, 5), strides=(1, 1), padding='same', use_bias=False))
    assert model.output_shape == (None, 7, 7, 128)
    model.add(layers.BatchNormalization())
    model.add(layers.LeakyReLU())

    model.add(layers.Conv2DTranspose(64, (5, 5), strides=(2, 2), padding='same', use_bias=False))
    assert model.output_shape == (None, 14, 14, 64)
    model.add(layers.BatchNormalization())
    model.add(layers.LeakyReLU())

    model.add(layers.Conv2DTranspose(1, (5, 5), strides=(2, 2), padding='same', use_bias=False, activation='tanh'))
    assert model.output_shape == (None, 28, 28, 1)

    return model
We will check the functionality of the generator by randomly generating an image by the untrained model.
#View a sample image generated by the the generator
generator = make_generator_model()
noise = tf.random.normal([1, 100])
generated_image = generator(noise, training=False)
plt.imshow(generated_image[0, :, :, 0])
Now, the function of the discriminator will be defined.
#Function for Discriminator of GAN
def make_discriminator_model():
    model = tf.keras.Sequential()
    model.add(layers.Conv2D(64, (5, 5), strides=(2, 2), padding='same',
                                     input_shape=[28, 28, 1]))
    model.add(layers.LeakyReLU())
    model.add(layers.Dropout(0.3))

    model.add(layers.Conv2D(128, (5, 5), strides=(2, 2), padding='same'))
    model.add(layers.LeakyReLU())
    model.add(layers.Dropout(0.3))

    model.add(layers.Flatten())
    model.add(layers.Dense(1))

    return model
Through this discriminator, we will classify the above-generated image as real or fake. The model gives a positive value for the real image and a negative value for the fake image.
discriminator = make_discriminator_model()
decision = discriminator(generated_image)
print (decision)
The untrained model has classified the above-generated image as fake because it has given a negative value in the output. Now, we will define a function that will return a helper function to compute cross-entropy loss.
# Cross entropy loss
cross_entropy = tf.keras.losses.BinaryCrossentropy(from_logits=True)
In the next step, we will define the functions for generator and discriminator to calculate loss during training. The discriminator loss function quantifies how well the discriminator is able to distinguish real images from fakes. It compares the discriminator’s predictions on real images to an array of 1s, and the discriminator’s predictions on fake (generated) images to an array of 0s.
#Dicriminator loss
def discriminator_loss(real_output, fake_output):
    real_loss = cross_entropy(tf.ones_like(real_output), real_output)
    fake_loss = cross_entropy(tf.zeros_like(fake_output), fake_output)
    total_loss = real_loss + fake_loss
    return total_loss
The generator loss function quantifies how well it was able to trick the discriminator. Intuitively, if the generator is performing well, the discriminator will classify the fake images as real (or 1). Here, it compares the discriminator’s decisions on the generated images to an array of 1s.
#Generator loss
def generator_loss(fake_output):
    return cross_entropy(tf.ones_like(fake_output), fake_output)
Now, we will define the optimizers for both generator and optimizer. As they both are different networks and will be trained separately, there are different optimizers defined for them.
#Optimizer
generator_optimizer = tf.keras.optimizers.Adam(1e-4)
discriminator_optimizer = tf.keras.optimizers.Adam(1e-4)
In the next steps, we will define the training hyperparameters and a training loop.
EPOCHS = 100
noise_dim = 100
num_examples_to_generate = 16

# We will reuse this seed overtime (so it's easier)
# to visualize progress in the animated GIF)
seed = tf.random.normal([num_examples_to_generate, noise_dim])
The training loop begins with generator receiving a random seed as input. That seed is used to produce an image. The discriminator is then used to classify real images (drawn from the training set) and fakes images (produced by the generator). The loss is calculated for each of these models, and the gradients are used to update the generator and discriminator.
# Notice the use of `tf.function`
# This annotation causes the function to be "compiled".
@tf.function
def train_step(images):
    noise = tf.random.normal([BATCH_SIZE, noise_dim])

    with tf.GradientTape() as gen_tape, tf.GradientTape() as disc_tape:
      generated_images = generator(noise, training=True)

      real_output = discriminator(images, training=True)
      fake_output = discriminator(generated_images, training=True)

      gen_loss = generator_loss(fake_output)
      disc_loss = discriminator_loss(real_output, fake_output)

    gradients_of_generator = gen_tape.gradient(gen_loss, generator.trainable_variables)
    gradients_of_discriminator = disc_tape.gradient(disc_loss, discriminator.trainable_variables)
    generator_optimizer.apply_gradients(zip(gradients_of_generator, generator.trainable_variables))
    discriminator_optimizer.apply_gradients(zip(gradients_of_discriminator, discriminator.trainable_variables))
Now, the function of training will be defined.
def train(dataset, epochs):
  for epoch in range(epochs):
    start = time.time()

    for image_batch in dataset:
      train_step(image_batch)

    # To produce images for the GIF
    display.clear_output(wait=True)
    generate_and_save_images(generator, epoch + 1,seed)

    #To save the model every 15 epochs
    if (epoch + 1) % 15 == 0:
      checkpoint.save(file_prefix = checkpoint_prefix)

    print ('Time for epoch {} is {} sec'.format(epoch + 1, time.time()-start))

  #To generate after the final epoch
  display.clear_output(wait=True)
  generate_and_save_images(generator, epochs, seed)
Function to generate and save images is defined below.
def generate_and_save_images(model, epoch, test_input):
  # Notice `training` is set to False.
  # This is so all layers run in inference mode (batchnorm).
  predictions = model(test_input, training=False)

  fig = plt.figure(figsize=(10,10))

  for i in range(predictions.shape[0]):
      plt.subplot(4, 4, i+1)
      plt.imshow(predictions[i, :, :, 0] * 127.5 + 127.5)
      plt.axis('off')

  plt.savefig('image_at_epoch_{:04d}.png'.format(epoch))
  plt.show()
After completing the above steps, we will start training our model. The training of generator and discriminator will be performed simultaneously.
#Training
train(train_dataset, EPOCHS)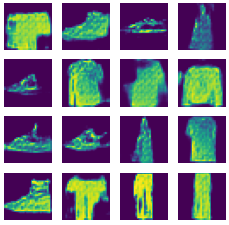
After the successful training, the set of images are generated. We will define a function to view a single image comprising all those images.
# Display a single image using the epoch number
def display_image(epoch_no):
  return PIL.Image.open('image_at_epoch_{:04d}.png'.format(epoch_no))
display_image(EPOCHS)
Now, the below code snippet will create an animated gif using the images saved during training.
#Animated GIF of images
anim_file = 'dcgan.gif'

with imageio.get_writer(anim_file, mode='I') as writer:
  filenames = glob.glob('image*.png')
  filenames = sorted(filenames)
  last = -1
  for i,filename in enumerate(filenames):
    frame = 2*(i**0.5)
    if round(frame) > round(last):
      last = frame
    else:
      continue
    image = imageio.imread(filename)
    writer.append_data(image)
  image = imageio.imread(filename)
  writer.append_data(image)
Finally, we will download the created GIF.
try:
  from google.colab import files
except ImportError:
   pass
else:
  files.download(anim_file)
The downloaded GIF is given below. It comprises the images that are generated during the training.
We can perform more training iterations with hyperparameter tuning in order to generate more clear visualizations of the images generated by the deep convolutional GAN.
Note: The above execution is inspired by TensorFlow’s tutorial in which handwritten digits are generated using this GAN model.