

Machine learning is a continuous process of gathering, processing data, extracting meaningful features, and finally modelling that refined data. After completing the cumbersome procedure the life cycle did not end here. To have user interaction on this model, we have to employ various deploying strategies over Cloud, IoT-based, edge devices such as mobile phones. The deployment platform basically depends on the use case of the application. In this article, we will discuss cloud-based deployment using the Heroku cloud service. Below are the major points listed that we will be discussing.
Table of contents
- What is Heroku?
- Our ML model
- Building web application
- Step-by-step deploying using Heroku
Let’s first understand what Heroku is.
What is Heroku?
Heroku is a Platform as a Service (PaaS) platform that allows developers to host serverless programs. This means that scripts can be written to serve either one or the other for certain needs. AWS (Amazon Web Services) hosts the Heroku platform, which is an infrastructure as a service solution.
Heroku is a free platform with a 500-hour up time constraint. The apps are hosted on a dyno, which falls into sleep mode after 30 minutes of inactivity. This ensures that your app does not consume all of your spare time while you are not using it. Ruby, Java, PHP, Python, Node, Go, and Scala are all supported on the platform. Most Data Science newbies use this platform to gain experience running and deploying models in the real world.
Our ML model
The ML model that we are going to deploy aims to predict whether a certain patient will suffer from cardiac arrest or not based on 10 input features. The complete model building procedure starting from pre-processing to the evaluation are all well documented in this notebook.
Basically, when building a web application we need to deal with frontend logic, backend logic, and cloud service which will serve our application. Frontend logic is that part that we often see when visiting any website and giving or mentioning our responses and that response is further processed by the backend logic.
Here in our case by using the frontend, we will take the values for our model for which it will predict the outcomes and in the backend, we’ll process these values to the model’s method .predict() in order to get a prediction. And with that obtained prediction we’ll further pass to the frontend.
In the upcoming section, we’ll discuss how we can prepare our model for the web interface, the minimal HTML file setup, and the web framework setup.
Building web application
As discussed earlier we need to have prepared our ML such that it can be interfaced with web frameworks easily and this process is usually referred to as the serialization and deserialization of the model.
Various model formats are commonly used, such as Pickle, a job-lib from sklearn that turns the Python Object Model into a bitstream in export format and allows the model to be integrated into technologies such as Java. We’ll use the Pickle module to export the model. As you can see from the notebook, the API for serializing and deserializing is simple.
import pickle

# serializing
pickle.dump(model,open('Healtcare.pkl','wb'))
# deserializing
pic=pickle.load(open('Healthcare.pkl','rb'))
Now to provide the interaction link between this model and the user we have leveraged the web development frameworks such as the famous one FLASK. It’s a simple framework that allows you to create a server with just a few lines of code. Many features, such as authentication and RESTful nature, are not explicitly supported because it is a small package.
Before moving further let’s understand the structure of the directory of our project. I have carried out all this web-related development in VS code and the structure of my working directory is as follows,

The static and templates folders are being used by the flask’s render_template module which basically renders our HTML page straightforward. The template folder contains our main HTML file and the static folder contains images that are used in the HTML page.
Virtual contains all the packages that we have installed for this model. Later we have app.py which contains the main logic of the application. Next to it, we have a pickle file that we have created earlier.
The next one is Procfile. A Procfile is included with Heroku apps, and it provides the commands that the app will run when it starts up. A Procfile can be used to declare a wide range of process types, including The web server for your app.
The last one is the requirements.txt file which holds information for all the packages that we have used in this project and Heroku should install all these packages in order to run the application. This file can be easily created by using pip as,
pip freeze > requirements.txt
Now let’s take a look at the app.py file where we have written code for web applications.
# import dependencies
from flask import Flask,render_template,request
import numpy as np
import pickle

model=pickle.load(open('Healthcare.pkl','rb'))

app = Flask(__name__)

@app.route('/',methods=['POST','GET'])
def new():
    return render_template('new.html')

@app.route('/predict', methods=['POST'] )
def predict():
    # getting data
    data1=float(request.form['a'])
    data2=float(request.form['b'])
    data3=float(request.form['c'])
    data4=float(request.form['d'])
    data5=float(request.form['e'])
    data6=float(request.form['f'])
    data7=float(request.form['g'])
    data8=float(request.form['h'])
    data9=float(request.form['i'])
    data10=float(request.form['j'])

    # preparing for the prediction
    features=np.array([data1,data2,data3,data4,data5,data6,data7,data8,data9,data10])
    pred = model.predict([features])

    def statement():
        if pred == 0:
            return 'Result:- The model has predicted that you will not suffer from any cardic arresst but you should take care of your self.'
        else:
            return 'Result:- You should consult with doctor, The model has predicted that you will suffer form cardic arrest.'

    return render_template('new.html',statement=statement())

if __name__=='__main__':
    app.run(debug=True)
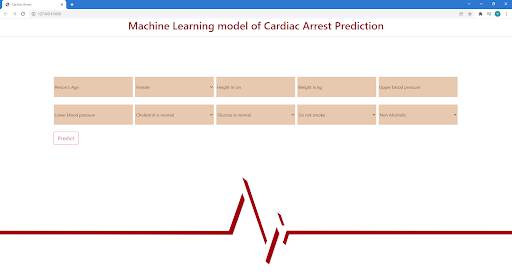
Our web application will contain a single page, known as the default or main page. The ‘/’ route is the home URL. This should, by default, take you to the index.html file, which serves as the main page.
When a user arrives at the main page, we want to do a specific action. We built a function that would answer user queries based on POST requests.
When information is delivered back to the web server, a user makes a POST request. We give the user the option of filling in those ten features. We get this information from an HTML file one by one by utilizing the request.form method by mentioning the key for each value.
Now we transform the feature list to a NumPy array and save it in the features list. Then, using the trained model, utilize the predict model function to make predictions. Finally, the expected result is displayed on the webpage.
Now in order to test this app simply run the app.py file from the terminal window of your IDE and it will host your application locally as below.
python app.py
Now in order to facilitate this interface globally, we’ll deploy it over the cloud using Heroku which is a free platform to deploy any web app.
Step-by-step deploying using Heroku
Heroku provides three different ways to deploy models: Heroku git, GitHub, and the container registry. The Git technique is used in this post to deploy the model. The GIT and Heroku CLI (You can create and administer Heroku apps straight from the terminal using the Heroku Command Line Interface (CLI).) need to be installed in our system and the installation procedure is similar to any software installation procedure, just follow the default configuration settings.
Before moving further make sure you have created an account on Heroku if not create it here.
Now, let’s start the deployment procedure. We’ll do it step by step.
Step-1: type heroku login in the terminal window of VS code or any IDE that you’re working on or you can even use your OS terminal window too. After running this command you’ll pop up to Heroku’s login page where you have to log in. After successful login, you will see account details in a terminal window.

Step-2: After logging in we have to initialize the current directory as a working git repository and have to add all the files from the directory, for that you need to execute the below commands sequentially one after the other.
git init
git add
git commit -m ‘First version’
Step-3: Next after creating the git repository we need to tell Heroku to create our app by mentioning the name for the app, below is the command. Sometimes the name that you choose might not be available in that case, just change it to another.
Heroku cardiac-arrest-prediction
After successful deployment completion of this command, Heroku will give the URL where our app is going to be hosted. For this deployment the URL is
https://cardiac-arrest-prediction.herokuapp.com/
Step-4: Now we just need to push our repository to the server, this will create our application with all the dependencies from the requirements.txt file and you can also track this procedure in your terminal window. The command to push the application over the web is as follows,
git heroku push master
After the successful execution of this command, our application will be live at the above-mentioned URL.
Final words
Through this article, we have discussed how we can deploy a machine learning model as an application over the web. We have deployed our model right from the terminal window, as mentioned earlier the deployment can be carried out through Git-Hub also for that you have to create a master branch for the git-hub repository and upload all files there and from the Heroku website, you can easily deploy the model.
All the files for this deployment can be found in this repository.