The MLX90614 infrared thermometer with Arduino allows you to make temperature measurements without the need to be in contact with the surface.
It is an effective way to make temperature measurements in situations where it is difficult to access the surface to be measured. However, the technology behind the infrared thermometer with Arduino is not easy. It is based on the Stefan-Boltzmann Law and how a body emits infrared radiation that is proportional to its temperature.
In this article, I will talk about how an infrared thermometer works and how to use it with Arduino. First, you have to understand what it is and its basic principle and then put it into practice.
How an infrared thermometer Works
It is used for medical and agricultural use or to measure the temperature of equipment or a device.
This last function is very important since it can prevent problems inside the machines and electronic devices. Especially when the surface to be controlled is not accessible to measure with a contact thermometer. The infrared thermometer has become very popular. You can find different prices, qualities and benefits in the market. There’s even an infrared thermometer that connects to a mobile app.

Basic principle of the infrared thermometer
The human temperature is between 36ºC and 37.2ºC. Below this range, you can suffer hypothermia and above the same, you have fever.
So how can an infrared thermometer know that your body is at 36ºC?
The molecules that are inside our body or any object are not standing still. They move like kids when they have a chocolate overdose in a ball park. They don’t stand still even if you tie them up.
The same thing happens to molecules. Also, when they move, they emit infrared radiation. This radiation is below the visible spectrum of light and therefore we, humans, cannot see it.
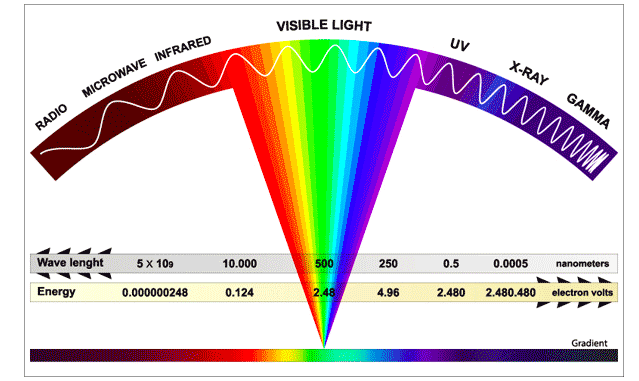
The higher the temperature of the body or object, the faster the molecules move and the more infrared radiation the body emits. Even if you can heat a body a lot, it can emit visible light.
It resembles the big furnaces in steel mills when they melt metals. By heating both the metal can glow red and even white.
Technical characteristics of the MLX90614
The name MLX90614 refers to a family of infrared thermometers. Within this family there are several models. They are identified by a 3-letter suffix.
MLX90614 temperature range and precision
It is important to look at the temperature range that an infrared thermometer such as the MLX90614 can measure. Depending on what you want to measure, you will have to choose one model or another.
The BAA model of the MLX90614 infrared thermometer supports a temperature range of -40ºC to 125ºC for ambient temperature and -70ºC to 380ºC for the surface temperature of objects.
Regarding precision, it depends on the temperature range that you are measuring. In the following table obtained from the technical characteristics sheet of this particular model, there is a summary of the precisions.
The ambient temperatures (Ta) are represented on the X axis. The Y axis represents the temperature of the object (To).

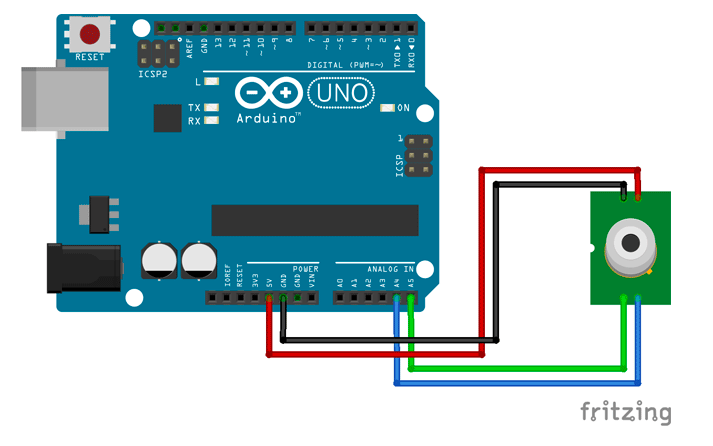
How to connect MLX90614 infrared thermometer with Arduino
The connection of the infrared thermometer with Arduino is very simple since it uses the I2C communication interface like many other components.
The MLX90614 thermometer has 4 pins:
1. VIN: power pin. It will depend on the voltage regulator but the normal thing is that you can supply 5V or 3V3.
2. GND: ground pin or 0V.
3. SCL: clock signal pin of the I2C interface.
4. SDA: I2C interface data signal pin.
To connect the infrared thermometer with Arduino follow the following electrical diagrams.

How to program MLX90614 infrared thermometer on Arduino
To program the infrared thermometer with Arduino the first thing you need to do is to download the Arduino library. In this case, we are going to use the one named Adafruit.
It is a very simple library that allows obtaining the temperature in degrees Celsius and degrees Fahrenheit. Open Library Manager and search for MLX90614 and install the Adafruit version.
Once installed you can now load the following code. Tcode works the same way on any board compatible with the Arduino platform.