Computer vision-based tasks are evolving daily; so many algorithms today can do tasks like image classification and object detection. In image classification, we classify the entire image as a class. In contrast, in object detection, we move a little further to trace each object present in the image and classify those objects based on our interest. What if we need further deeper detection such as sidewalks, pedestrians, vehicles, or more detail to measure the volume of certain objects present in the images to do such a task? The conventional object detection algorithm will not work up to the mark.
Here comes the image segmentation in the picture. We localise the objects based on pixels in more detail; in computer vision, image segmentation is partitioning an image into multiple segments such as a set of pixels, also known as an object. The goal is really simple: to change the representation of images in a more meaningful way to extract more information associated with the image. It is typically used to locate the boundaries of an object in an image by assigning the label to every pixel such that pixels with the same label share certain characteristics.
The result of a segmented image consists of a set of segments that collectively covers the entire image. Each pixel in a region is similar to some characteristics or computed properties such as color, intensity and texture.
Today in this article, we are going to discuss Deep labeling an algorithm made by Google. DeepLab is short for Deep Labeling, which aims to provide SOTA and an easy to use Tensorflow code base for general dense pixel labeling. DeepLab refers to solving problems by assigning a predicted value for each pixel in an image or video with the help of deep neural network support.
Typically dense pixel prediction problems include terms like semantic level segmentation, instance-level segmentation, panoptic segmentation, depth estimation, video panoptic segmentation and so on. Let’s take brief information of some these techniques;
Semantic segmentation
It is one step ahead of the image classification; for a better understanding of the scene, it recognizes the object with the image with pixel-level accuracy requiring a precise outline of an object. It is usually formulated as pixel-wise classification where each pixel is labeled by predicted value encoding its semantic class. It is a technique to localise the same category object and assign a common label for those pixels.
Instance segmentation:
Instance segmentation recognizes and localizes object instances with high pixel-level accuracy.
DeepLab tackles the instance segmentation by detecting the instances nothing but a group of semantic objects on top of segmentation prediction. DeepLab labels each thing pixel by a predicted value encoding both semantic class and instance identity and ignores the Stuff pixels.
Panoptic segmentation:
Panoptic segmentation unifies semantic segmentation and instance segmentation. This task disallows the overlapping instance mask and labels each pixel, including thing and stuff pixel with predicted value encoding semantic class and instance identity.
Monocular depth estimation:
Monocular depth estimation tries to understand the depth of scene by the 3D geometry of the scene labeling each pixel with an estimated depth value. It is the most important information for autonomous systems to perceive the environment and estimate their state.
The below image shows the example of semantic segmentation, instance segmentation and panoptic segmentation given by the Panoptic DeepLab model, one of the variants of the DeepLab model on a cityscapes image.

The newly launched DeepLab2 library supports all of its variants as Panoptic DeepLab, Axial-DeepLab, MaX-DeepLab, Motion-DeepLab, ViP-DeepLab and also has the support of neural architectures like MobileNet_v3, ResNet, SWideRNet and Axial-ResNet for details for these models and architecture you follow this official research paper.
Code Implementation of DeepLab2:
The following code is taken from the official release, which shows the demo example of DeepLab2. The models are trained on the COCO dataset, Cityscape dataset, KITTI Step dataset and MOT challenge dataset.
Importing all dependencies:
 #for image handling
 from matplotlib import gridspec
 import matplotlib.pyplot as plt
 from PIL import Image
 import urllib
 import numpy as np
 import tensorflow as tf
 import collections
 import os
 import tempfile
 from google.colab import files # to load files from local machine
Helper Functions:
It consists of the methods used to channel the label colormap, the dataset information, classes associated with the problem, segmentation function, plotting function, and panoptic mapping.
 DatasetInfo = collections.namedtuple(
     'DatasetInfo','num_classes, label_divisor, thing_list, colormap, class_names')
 def _cityscapes_label_colormap():
   """Creates a label colormap used in CITYSCAPES segmentation benchmark
   """
   colormap = np.zeros((256, 3), dtype=np.uint8)
   colormap[0] = [128, 64, 128]
   colormap[1] = [244, 35, 232]
   colormap[2] = [70, 70, 70]
   colormap[3] = [102, 102, 156]
   colormap[4] = [190, 153, 153]
   colormap[5] = [153, 153, 153]
   colormap[6] = [250, 170, 30]
   colormap[7] = [220, 220, 0]
   colormap[8] = [107, 142, 35]
   colormap[9] = [152, 251, 152]
   colormap[10] = [70, 130, 180]
   colormap[11] = [220, 20, 60]
   colormap[12] = [255, 0, 0]
   colormap[13] = [0, 0, 142]
   colormap[14] = [0, 0, 70]
   colormap[15] = [0, 60, 100]
   colormap[16] = [0, 80, 100]
   colormap[17] = [0, 0, 230]
   colormap[18] = [119, 11, 32]
   return colormap
 def _cityscapes_class_names():
   return ('road', 'sidewalk', 'building', 'wall', 'fence', 'pole',
           'traffic light', 'traffic sign', 'vegetation', 'terrain', 'sky',
           'person', 'rider', 'car', 'truck', 'bus', 'train', 'motorcycle',
           'bicycle')
 def cityscapes_dataset_information():
   return DatasetInfo(
       num_classes=19,
       label_divisor=1000,
       thing_list=tuple(range(11, 19)),
       colormap=_cityscapes_label_colormap(),
       class_names=_cityscapes_class_names())
 def perturb_color(color, noise, used_colors, max_trials=50, random_state=None):
   """Pertrubs the color with some noise"""
   if random_state is None:
     random_state = np.random
   for _ in range(max_trials):
     random_color = color + random_state.randint(
         low=-noise, high=noise + 1, size=3)
     random_color = np.clip(random_color, 0, 255)
     if tuple(random_color) not in used_colors:
       used_colors.add(tuple(random_color))
       return random_color
   print('Max trial reached and duplicate color will be used')
   return random_color
 def color_panoptic_map(panoptic_prediction, dataset_info, perturb_noise):
   """Helper method to colorize output panoptic map"""
   if panoptic_prediction.ndim != 2:
     raise ValueError('Expect 2-D panoptic prediction. Got {}'.format(
         panoptic_prediction.shape))
   semantic_map = panoptic_prediction // dataset_info.label_divisor
   instance_map = panoptic_prediction % dataset_info.label_divisor
   height, width = panoptic_prediction.shape
   colored_panoptic_map = np.zeros((height, width, 3), dtype=np.uint8)
   used_colors = collections.defaultdict(set)
   # Use a fixed seed to reproduce the same visualization.
   random_state = np.random.RandomState(0)
   unique_semantic_ids = np.unique(semantic_map)
   for semantic_id in unique_semantic_ids:
     semantic_mask = semantic_map == semantic_id
     if semantic_id in dataset_info.thing_list:
       # For `thing` class, we will add a small amount of random noise to its
       # correspondingly predefined semantic segmentation colormap.
       unique_instance_ids = np.unique(instance_map[semantic_mask])
       for instance_id in unique_instance_ids:
         instance_mask = np.logical_and(semantic_mask,
                                        instance_map == instance_id)
         random_color = perturb_color(
             dataset_info.colormap[semantic_id],
             perturb_noise,
             used_colors[semantic_id],
             random_state=random_state)
         colored_panoptic_map[instance_mask] = random_color
     else:
       # For `stuff` class, we use the defined semantic color.
       colored_panoptic_map[semantic_mask] = dataset_info.colormap[semantic_id]
       used_colors[semantic_id].add(tuple(dataset_info.colormap[semantic_id]))
   return colored_panoptic_map, used_colors
 def vis_segmentation(image,
                      panoptic_prediction,
                      dataset_info,
                      perturb_noise=60):
   """Visualizes input image, segmentation map and overlay view."""
   plt.figure(figsize=(30, 20))
   grid_spec = gridspec.GridSpec(2, 2)
   ax = plt.subplot(grid_spec[0])
   plt.imshow(image)
   plt.axis('off')
   ax.set_title('input image', fontsize=20)
   ax = plt.subplot(grid_spec[1])
   panoptic_map, used_colors = color_panoptic_map(panoptic_prediction,
                                                  dataset_info, perturb_noise)
   plt.imshow(panoptic_map)
   plt.axis('off')
   ax.set_title('panoptic map', fontsize=20)
   ax = plt.subplot(grid_spec[2])
   plt.imshow(image)
   plt.imshow(panoptic_map, alpha=0.7)
   plt.axis('off')
   ax.set_title('panoptic overlay', fontsize=20)
   ax = plt.subplot(grid_spec[3])
   max_num_instances = max(len(color) for color in used_colors.values())
   # RGBA image as legend.
   legend = np.zeros((len(used_colors), max_num_instances, 4), dtype=np.uint8)
   class_names = []
   for i, semantic_id in enumerate(sorted(used_colors)):
     legend[i, :len(used_colors[semantic_id]), :3] = np.array(
         list(used_colors[semantic_id]))
     legend[i, :len(used_colors[semantic_id]), 3] = 255
     if semantic_id < dataset_info.num_classes:
       class_names.append(dataset_info.class_names[semantic_id])
     else:
       class_names.append('ignore')
   plt.imshow(legend, interpolation='nearest')
   ax.yaxis.tick_left()
   plt.yticks(range(len(legend)), class_names, fontsize=15)
   plt.xticks([], [])
   ax.tick_params(width=0.0, grid_linewidth=0.0)
   plt.grid('off')
   plt.show()
Model Selection:
There are a total 11 pretrained models for different architectures as mentioned previously that are made available by the researchers by which we can test the segmentation. Change the model accordingly from _MODELS in MODEL_NAME in the below code;
 MODEL_NAME = 'resnet50_os32_panoptic_deeplab_cityscapes_crowd_trainfine_saved_model'
 _MODELS = ('resnet50_os32_panoptic_deeplab_cityscapes_crowd_trainfine_saved_model',
            'resnet50_beta_os32_panoptic_deeplab_cityscapes_trainfine_saved_model',
            'wide_resnet41_os16_panoptic_deeplab_cityscapes_trainfine_saved_model',
            'swidernet_sac_1_1_1_os16_panoptic_deeplab_cityscapes_trainfine_saved_model',
            'swidernet_sac_1_1_3_os16_panoptic_deeplab_cityscapes_trainfine_saved_model',
            'swidernet_sac_1_1_4.5_os16_panoptic_deeplab_cityscapes_trainfine_saved_model',
            'axial_swidernet_1_1_1_os16_axial_deeplab_cityscapes_trainfine_saved_model',
            'axial_swidernet_1_1_3_os16_axial_deeplab_cityscapes_trainfine_saved_model',
            'axial_swidernet_1_1_4.5_os16_axial_deeplab_cityscapes_trainfine_saved_model',
            'max_deeplab_s_backbone_os16_axial_deeplab_cityscapes_trainfine_saved_model',
            'max_deeplab_l_backbone_os16_axial_deeplab_cityscapes_trainfine_saved_model')
 _DOWNLOAD_URL_PATTERN = 'https://storage.googleapis.com/gresearch/tf-deeplab/saved_model/%s.tar.gz'
 _MODEL_NAME_TO_URL_AND_DATASET = {
     model: (_DOWNLOAD_URL_PATTERN % model, cityscapes_dataset_information())
     for model in _MODELS
 }
 MODEL_URL, DATASET_INFO = _MODEL_NAME_TO_URL_AND_DATASET[MODEL_NAME]
Load the model:
 model_dir = tempfile.mkdtemp()
 download_path = os.path.join(model_dir, MODEL_NAME + '.gz')
 urllib.request.urlretrieve(MODEL_URL, download_path)
 !tar -xzvf {download_path} -C {model_dir}
 LOADED_MODEL = tf.saved_model.load(os.path.join(model_dir, MODEL_NAME))
Infer the model:
To upload images from the local machine, plugin support by Colab.
 # Optional, upload an image from your local machine.
 uploaded = files.upload()
 if not uploaded:
   UPLOADED_FILE = ''
 elif len(uploaded) == 1:
   UPLOADED_FILE = list(uploaded.keys())[0]
 else:
   raise AssertionError('Please upload one image at a time')
 # Using provided sample image if no file is uploaded.
 if not UPLOADED_FILE:
   # Default image from Mapillary dataset samples (https://www.mapillary.com/dataset/vistas).
   # Neuhold, Gerhard, et al. "The mapillary vistas dataset for semantic understanding of street scenes." ICCV. 2017.
   image_dir = tempfile.mkdtemp()
   download_path = os.path.join(image_dir, 'MVD_research_samples.zip')
   urllib.request.urlretrieve(
       'https://static.mapillary.com/MVD_research_samples.zip', download_path)
   !unzip {download_path} -d {image_dir}
   UPLOADED_FILE = os.path.join(image_dir, 'Asia/tlxGlVwxyGUdUBfkjy1UOQ.jpg')
 with tf.io.gfile.GFile(UPLOADED_FILE, 'rb') as f:
   im = np.array(Image.open(f))
 output = LOADED_MODEL(tf.cast(im, tf.uint8))
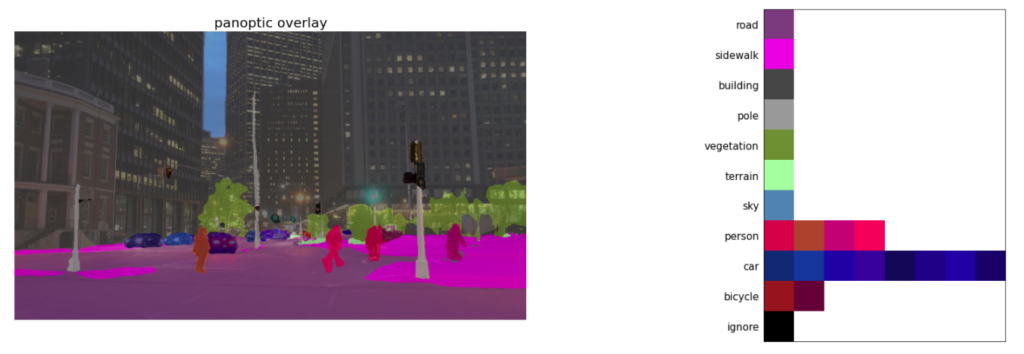
 vis_segmentation(im, output['panoptic_pred'][0], DATASET_INFO)

Conclusion:
So we have seen what image segmentation means and its importance when the deep analysis is required for the specific problem statement. Also, we have seen the brief information of common tasks taken by such an algorithm to produce accurate results—for example, we. We can check the model’s accuracy from the above output image; the model correctly segmented the tiny space as the sky, and actually, it is the sky.


