|
Listen to this story
|
Image segmentation forms the basis of numerous Computer Vision projects. It segments the visual input in order to process it for tasks such as image classification and object detection. However, all the segmentation techniques may not delineate the objects in an image factory with equally satisfying accuracy. Some may be capable of merely identifying the presence of different kinds of objects in the image, some may separate out occurrences of each object type while some others may perform both these tasks. Accordingly, recent image segmentation methods can be classified into three categories viz. semantic segmentation, instance segmentation and panoptic segmentation.
We gave an overview of semantic and instance segmentation in our article based on SOLO and SOLOv2 frameworks (weblink). We have also explained about panoptic segmentation with a Python code implementation in our previous article (weblink). This article gives a brief overview of each of these methods and compares them from certain perspectives.
Firstly, let us understand what semantic, instance and panoptic segmentation mean using a lucid example.
Suppose, you have an input image of a street view consisting of several people, cars, buildings etc. If you only want to group objects belonging to the same category, say distinguish all cars from all buildings, it is the task of semantic segmentation. Within each category say, people, if you want to distinguish each individual person, that will be the task of instance segmentation. Whereas if you want both category-wise as well as instance-wise division, it will be a panoptic segmentation task.
Have a look at the following figure to visualize the above example and have clarity in your mind about the three ways of image segmentation.
There are two basic conventions followed in an image segmentation task which are as follows:
- Any countable entity such as a person, bird, flower, car etc. is termed as a thing.
- An uncountable amorphous region of identical texture such as the sky is termed as stuff.
Study of things comes under instance segmentation since they can be assigned instance-level annotations while that of stuff comes under semantic segmentation. Panoptic segmentation handles both thing classes as well as stuff.
The basic difference between the three segmentation techniques
Semantic segmentation associates every pixel of an image with a class label such as a person, flower, car and so on. It treats multiple objects of the same class as a single entity. In contrast, instance segmentation treats multiple objects of the same class as distinct individual instances.
To combine the concepts of both semantic and instance segmentation, panoptic segmentation assigns two labels to each of the pixels of an image – (i)semantic label (ii) instance id. The identically labelled pixels are considered belonging to the same semantic class and instance their id’s distinguish its instances.
Semantic segmentation and panoptic segmentation
Both semantic and panoptic segmentation tasks require each pixel in an image to be assigned a semantic label. Thus both the techniques are similar if the ground truth does not specify instances or if all the classes are stuff. However, the inclusion of thing classes (each of which may have multiple instances per image) differentiates these tasks.
Instance segmentation and panoptic segmentation
Instance segmentation and panoptic segmentation both segment each object instance in an image. However, the difference lies in the handling of overlapping segments. Instance segmentation permits overlapping segments while the panoptic segmentation task allows assigning a unique semantic label and a unique instance-id each pixel of the image. Hence, for panoptic segmentation, no segment overlaps are possible.
Confidence scores
Unlike instance segmentation, semantic segmentation and panoptic segmentation do not require confidence scores associated with each segment. This makes the study of human consistency easier for these methods. But for instance segmentation, such a study is difficult as human annotators do not provide confidence scores explicitly.
Evaluation metrics
For semantic segmentation, IoU, pixel-level accuracy and mean accuracy are commonly used metrics. These metrics ignore object-level labels while considering only those at pixel-level.
Since instance labels are not taken into consideration, these metrics cannot evaluate thing classes.
For instance segmentation, AP (Average Precision) is taken as the standard metric. It requires assignment of confidence score to each segment for estimation of a precision/recall curve. Confidence scores and hence AP cannot measure the output of semantic segmentation.
On the contrary, PQ (Panoptic Quality) used as a metric for panoptic segmentation equally treats all the classes – be it a thing or stuff. It must be noted that PQ is not a combination of semantic and instance segmentation metrics. SQ (i.e. average IoU of matched segments) and RQ (i.e. F1-Score) are computed for every class and measure segmentation and recognition quality, respectively. PQ is then calculated as (PQ = SQ * RQ). It thus unifies evaluation over all the classes.
Practical Implementation
To compare all the three image segmentation techniques, we have applied each of them on a common image. Have a look at the input image as well as the code and output of each segmentation method.
Semantic segmentation
We have used the PixelLib Python library here which has been built for performing segmentation of images and videos with much ease.
Install PixelLib and its dependencies as follows:
 pip3 install tensorflow
 pip3 install opencv-python
 pip3 install scikit-package
 pip3 install pillow
 pip3 install pixellib
(Read our article on the pillow library used here)
Import statements
 import pixellib
 from pixellib.instance import semantic_segmentation
Instantiate the semantic_segmentation class of pixellib
segment_image = semantic_segmentation()
Load the xception model trained on pascal voc for segmenting objects. The model can be downloaded from here.
segment_image.load_pascalvoc_model(“deeplabv3_xception_tf_dim_ordering_tf_kernels.h5”)
Load the function to perform segmentation
segment_image.segmentAsPascalvoc(“path_to_input_image”, output_image_name = “path_to_output_image”)
Output:
Instance segmentation
For instance segmentation also, we have used PixelLab library. Install the library and its dependencies as done above for semantic segmentation.
Import statements
 import pixellib
 from pixellib.instance import instance_segmentation
 segment_image = instance_segmentation()
Load the mask r-cnn model to perform instance segmentation. The model can be downloaded from here.
segment_image.load_model("mask_rcnn_coco.h5")
Perform instance segmentation on an image
segment_image.segmentImage("path_to_image", output_image_name = "output_image_path")
The Mask R_CNN model is trained on Microsoft Coco dataset, a dataset with 80 common object categories.
Output:

Panoptic segmentation
We have used MS-COCO dataset, PyTorch Python library and Detectron2 (a PyTorch-based modular library by Facebook AI Research (FAIR) for implementing object detection algorithms and also a rewrite of Detectron library). We have also used the DETR (DEtection TRansformer) framework introduced by FAIR.
Refer to the following links if you are unaware of Detectron, Detectron2 and DETR:
Import the required libraries
 from PIL import Image
 import requests
 import io
 import math
 import matplotlib.pyplot as plt
 %config InlineBackend.figure_format = 'retina'
 import torch
 from torch import nn
 from torchvision.models import resnet50
 import torchvision.transforms as T
 import numpy
 torch.set_grad_enabled(False);
 import itertools
 import seaborn as sns
Install the Panoptic API from GitHub for panoptic inference
! pip install git+https://github.com/cocodataset/panopticapi.git
Import the installed API
 import panopticapi
 from panopticapi.utils import id2rgb, rgb2id
List of COCO semantic classes:
 CLASSES = [
     'N/A', 'person', 'bicycle', 'car', 'motorcycle', 'airplane', 'bus',
     'train', 'truck', 'boat', 'traffic light', 'fire hydrant', 'N/A',
     'stop sign', 'parking meter', 'bench', 'bird', 'cat', 'dog', 'horse',
     'sheep', 'cow', 'elephant', 'bear', 'zebra', 'giraffe', 'N/A',
     'Backpack', 'umbrella', 'N/A', 'N/A', 'handbag', 'tie', 'suitcase',
     'frisbee', 'skis', ‘snowboard', 'sports ball', 'kite', 'baseball bat',
     'baseball glove', 'skateboard', 'surfboard', 'tennis racket',
     'bottle', 'N/A', 'wine glass', 'cup', 'fork', 'knife', 'spoon',
     'bowl', 'banana', 'apple', 'sandwich', 'orange', 'broccoli', 'carrot',
     'hot dog', 'pizza', 'donut', 'cake', ‘chair', 'couch', 'potted
      plant', 'bed', 'N/A', 'dining table', 'N/A', 'N/A', 'toilet', 'N/A',
     'tv', 'laptop', 'mouse', 'remote', 'keyboard', 'cell phone',
     'microwave', 'oven', 'toaster', 'sink', 'refrigerator', 'N/A', 'book',
     'clock', 'vase', 'scissors', 'teddy bear', 'hair drier', ‘toothbrush']
Enumerate the above classes (Detectron2 model uses different numbering convention so we need to change it)
 coco2d2 = {}
 count = 0
 for i, c in enumerate(CLASSES):
   if c != "N/A":
     coco2d2[i] = count
     count+=1
Perform standard PyTorch mean-std input image normalization
 transform = T.Compose([
     T.Resize(800),
     T.ToTensor(),
     T.Normalize([0.485, 0.456, 0.406], [0.229, 0.224, 0.225])
 ])
Load a pre-trained model from torch hub and request the post-processor
 model, postprocessor = torch.hub.load('facebookresearch/detr', 'detr_resnet101_panoptic', pretrained=True, return_postprocessor=True, num_classes=250)
 model.eval();
Retrieve an image from the validation set of COCO dataset for testing purpose
 url = "http://images.cocodataset.org/val2017/000000281759.jpg"
 im = Image.open(requests.get(url, stream=True).raw)
Mean-std normalize the input testing image (batch-size: 1)
 img = transform(im).unsqueeze(0)
 out = model(img)
Compute the probability score for each possible class, excluding the “no-object” class (the last one)
scores = out["pred_logits"].softmax(-1)[..., :-1].max(-1)[0]
Threshold the confidence to only masks with high confidence >0/85
keep = scores > 0.85
Plot the masks satisfying the confidence level condition
 ncols = 5
 fig, axs = plt.subplots(ncols=ncols, nrows=math.ceil(keep.sum().item() /
 ncols), figsize=(18, 10))
 for line in axs:
     for a in line:
         a.axis('off')
 for i, mask in enumerate(out["pred_masks"][keep]):
     ax = axs[i // ncols, i % ncols]
     ax.imshow(mask, cmap="cividis")
     ax.axis('off')
 fig.tight_layout()
Merge the individual predictions obtained by running the above lines of code into a unified panoptic segmentation. For that, we use DETR’s postprocessor.
The post-processor requires as input the target size of predictions (image size here)
result = postprocessor(out, torch.as_tensor(img.shape[-2:]).unsqueeze(0))[0]
Visualize the panoptic segmentation’s results
The segmentation is stored in a special-format png
panoptic_seg = Image.open(io.BytesIO(result['png_string']))
panoptic_seg = numpy.array(panoptic_seg, dtype=numpy.uint8).copy()
Retrieve the instance id corresponding to each mask
panoptic_seg_id = rgb2id(panoptic_seg)
Color each mask individually and plot the visualization
 panoptic_seg[:, :, :] = 0
 for id in range(panoptic_seg_id.max() + 1):
   panoptic_seg[panoptic_seg_id == id] = numpy.asarray(next(palette)) * 255
 plt.figure(figsize=(15,15))
 plt.imshow(panoptic_seg)
 plt.axis('off')
 plt.show()
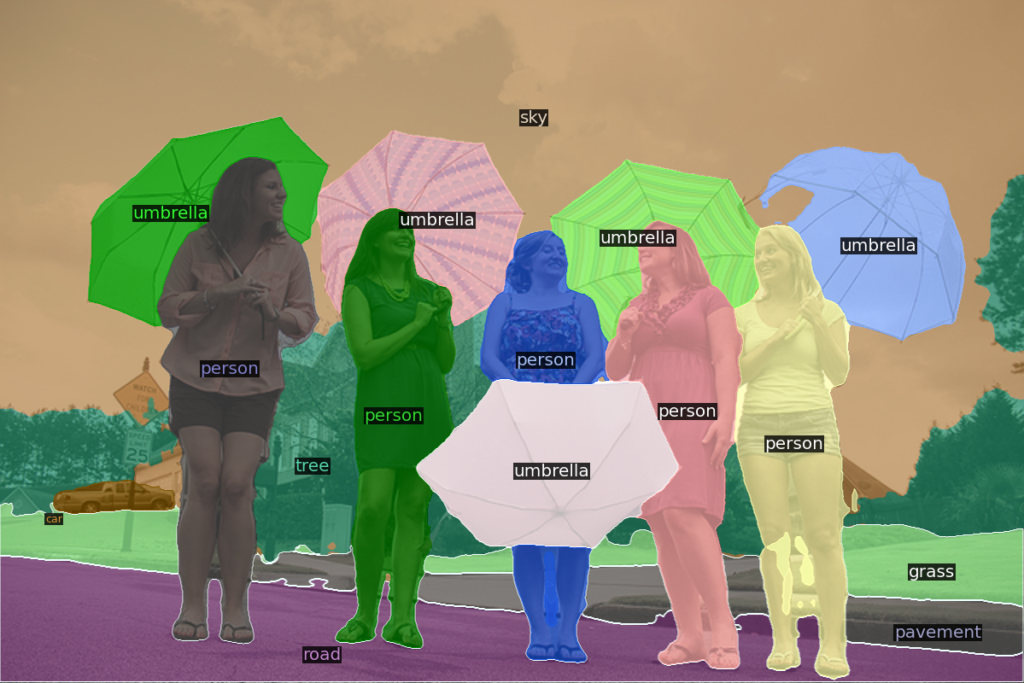
Output:
Use Detectron2’s plotting utilities to better visualize the above panoptic segmentation results.
Import the utilities
 !pip install detectron2==0.1.3 -f
 https://dl.fbaipublicfiles.com/detectron2/wheels/cu101/torch1.5/index.html
 from detectron2.config import get_cfg
 from detectron2.utils.visualizer import Visualizer
 from detectron2.data import MetadataCatalog
 from google.colab.patches import cv2_imshow
Extract the segments information and the panoptic result from DETR’s prediction
from copy import deepcopy
segments_info = deepcopy(result["segments_info"])
Store the panoptic predictions in a special format png
panoptic_seg = Image.open(io.BytesIO(result['png_string']))
final_w, final_h = panoptic_seg.size
Convert the png into segment id map
panoptic_seg = numpy.array(panoptic_seg, dtype=numpy.uint8)
panoptic_seg = torch.from_numpy(rgb2id(panoptic_seg))
Change Detectron2’s numbering to appropriate class id’s
 meta = MetadataCatalog.get("coco_2017_val_panoptic_separated")
 for i in range(len(segments_info)):
     c = segments_info[i]["category_id"]
     segments_info[i]["category_id"] =
     meta.thing_dataset_id_to_contiguous_id[c] if segments_info[i]
     ["isthing"] else meta.stuff_dataset_id_to_contiguous_id[c]
Visualize the improved prediction results
v = Visualizer(numpy.array(im.copy().resize((final_w, final_h)))[:, :, ::-1], meta, scale=1.0)
v._default_font_size = 20
v = v.draw_panoptic_seg_predictions(panoptic_seg, segments_info, area_threshold=0)
cv2_imshow(v.get_image())
Output:
Google colab notebooks for the above-implemented pieces of code:
Did you find the segmentation techniques interesting? Also read:
- Panoptic segmentation research paper
- Guide to Panoptic Segmentation (Article)
- SOLO and SOLOv2 for instance segmentation (Article)
- Build U-Net for image segmentation (Article)
- SDE for semantic segmentation (Article)


