

The problem with deep learning models is they need lots of data to train a model. There are two major problems while training deep learning models is overfitting and underfitting of the model. Those problems are solved by data augmentation is a regularization technique that makes slight modifications to the images and used to generate data.
In this article, we will demonstrate why data augmentation is known as a regularization technique. How to apply data augmentation to our model and whether it is used as a preprocessing technique or post-processing techniques…? All these questions are answered in the below demonstration.
Topics that we will demonstrate in this article:-
- Data augmentation as a regularizer and data generator.
- Implementing Data augmentation techniques.
Data Augmentation As a Regularizer and Data Generator
The regularization is a technique used to reduce the overfitting in the model. unnecessarily. In dealing with deep learning models, too much learning is also bad for the model to make a prediction with unseen data. If we get good results in training data and poor results in unseen data (test data, validation data) then it is framed as an overfitting problem. So now using data augmentation, we perform few transformations to the data like flipping, cropping, adding noise to the data, etc.
As you know, deep learning models are data hungry, if we are lacking data then by using data augmentation transformations of the image we can generate data. Data augmentation is a preprocessing technique because we only work on the data to train our model. In this technique, we generate new instances of images by cropping, flipping, zooming, shearing an original image. So, whenever the training lacks the image dataset, using augmentation, we can create thousands of images to train the model perfectly.
Implementing Data augmentation techniques using OpenCV
Flipping the image
In the below code snippet we are going to flip the image.
import cv2
from google.colab.patches import cv2_imshow
img = cv2.imread('/content/images (10).jpg')
print(type(img))
print(img.shape)
img_flip_ud = cv2.flip(img, 0)
cv2_imshow(img_flip_ud)
img_flip_lr = cv2.flip(img, 1)
cv2_imshow(img_flip_lr)
img_flip_ud_lr = cv2.flip(img, -1)
cv2_imshow(img_flip_ud_lr)


As you can see in the above output we flipped the image from 1 image we generated 4 images.
Resize an image
In the below code snippet we are going to rotate the image.
image=cv2.imread('/content/images (10).jpg')
cv2_imshow(image)
print(image.shape)
h1=300
w1=300
dimension = (w1, h1)
resized_image = cv2.resize(image, dimension, interpolation = cv2.INTER_AREA)
cv2_imshow(resized_image)


Cropping an Image
In the below code snippet we are going to crop the image.
image=cv2.imread('/content/images (10).jpg')
cv2_imshow(image)
cropped_image = image[50:170, 150:250]
cv2_imshow(cropped_image)

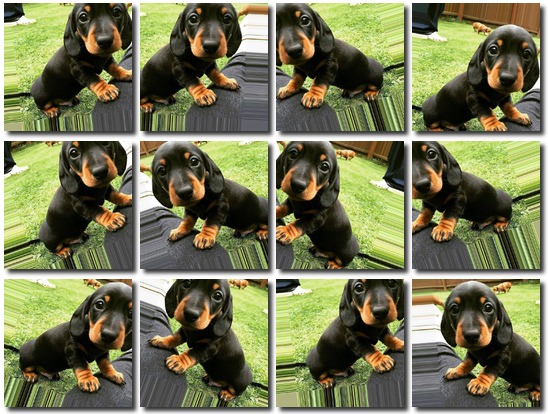
Implementing Data augmentation techniques using Keras
In the below code snippet we are performing data augmentation techniques using Keras.
from keras.preprocessing.image import ImageDataGenerator
from keras.preprocessing.image import array_to_img
from keras.preprocessing.image import img_to_array
from keras.preprocessing.image import load_img
generated_data = ImageDataGenerator(
        rotation_range = 40,
        shear_range = 0.2,
        zoom_range = 0.2,
        horizontal_flip = True,
        brightness_range = (0.5, 1.5))
img = load_img('/content/images (10).jpg')
x = img_to_array(img)
x = x.reshape((1, ) + x.shape)
i = 0
for batch in datagen.flow(x, batch_size = 1,
                          save_to_dir ='preview',
                          save_prefix ='image', save_format ='jpeg'):
    i += 1
    if i > 5:
        Break

Original image

Image after zooming

Image after apply rotation

Image after adding brightness
Conclusion
In the above demonstration, we demonstrated how data augmentation is used as a regularizer and to generate data. This is one of the best practices used by many programmers.