We have already seen a couple of pose estimation and face detection techniques in our previous article like 3ddfa-v2, OpenPose, Nvidia Imaginaire(Image & Video translation GAN Library), Yolov5, OneNet and many more. Today we will see a new face pose estimation, detection and alignment technique that uses 6DoF(degree of freedom) and 3D face estimation without face landmark/detection localization. The paper has been published by Vitor Albiero, Xingyu Chen2, Xi Yin2, Guan Pang, and Tal Hassner of Notre Dame University. According to them, using the 6DoF method is more reliable than face bounding box labels. More specifically, they did mainly three contributions to achieve the SOTA results:
(a) Introduced an easily trained, reliable, Faster R-CNN model that uses the 6DoF method for all faces in the photo, without using any face detection box technique.
(b) Authors explained how the pose is converted and processed.
(c) Also they have explained how face poses can really replace face bounding box training labels.
6DoF(degree of freedom) pose
With the 6DoF pose method, it is very easy to estimate faces than using landmark detection. Now calculating face pose is a 6D regression problem. In contrast, authors estimate the face poses without considering that faces that were already detected. 6DoF pose labels predict more than just face bounding box landmarks. Also it can be further converted to a 3D to 2D projection matrix. 6DoF provides information about the face’s 3D position and orientation.
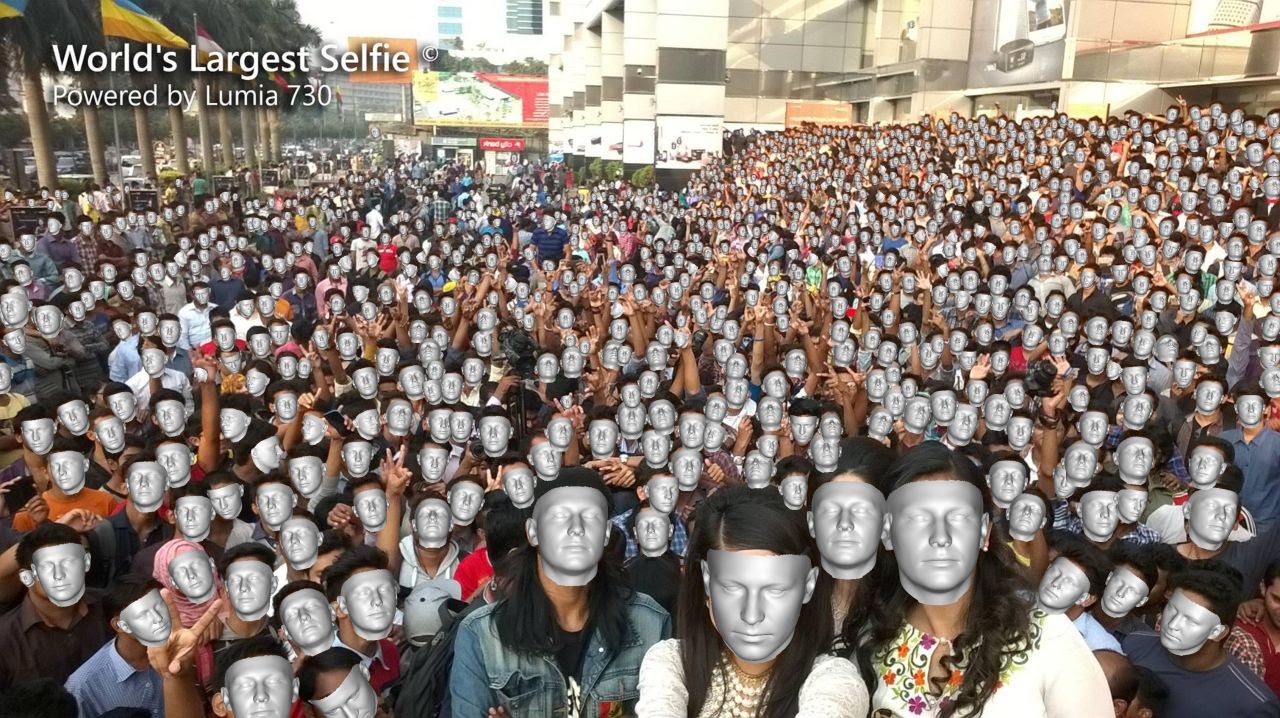
6DoF poses method is calculated by img2pose to capture the positions of all faces in the picture, for example, we can take the below picture.
their 3D scene locations are shown below:
img2pose network architecture
The network follows a two-level approach based on the Faster R-CNN model. The first level is a region proposal network (RPN) with a feature pyramid(FPN), which aims at inherent face locations in the photo.
The second level/stage of img2pose network architecture extracts features from every proposal with the region of interest (ROI) pooling. It then transfers them to two distinct heads: a regular face/no-face classifier and a new purposed 6DoF face pose regressor.
The model is trained on the WIDER FACE dataset. The dataset mainly offers annotated bounding box labels, with no annotation for poses, but another RetinaFace set provides annotated 5 points facial landmarks for 76000 WIDER FACE dataset faces.
Implementation
The project is trained and evaluated using PyTorch so let’s see how to reproduce the results. First, we will start by cloning the project and necessary package installation and environment setup, use below commands to do so.
!git clone https://github.com/vitoralbiero/img2pose.git
! cd img2pose
Install dependencies
 pip install -r requirements.txt
 # move back to the main directory if inside
 cd..
 # install renderer to visualize prepedition
 cd Sim3DR
 sh build_sim3dr.sh
Imports and necessary steps
 import sys
 sys.path.append('../../')
 import numpy as np
 import torch
 from torchvision import transforms
 from matplotlib import pyplot as plt
 from tqdm.notebook import tqdm
 from PIL import Image, ImageOps
 import matplotlib.patches as patches
 from scipy.spatial.transform import Rotation
 import pandas as pd
 from scipy.spatial import distance
 import time
 import os
 import math
 import scipy.io as sio
 from utils.renderer import Renderer
 from utils.image_operations import expand_bbox_rectangle
 from utils.pose_operations import get_pose
 from img2pose import img2poseModel
 from model_loader import load_model
 np.set_printoptions(suppress=True)
 def render_plot(img, poses, bboxes):
     (w, h) = img.size
     image_intrinsics = np.array([[w + h, 0, w // 2], [0, w + h, h // 2], [0, 0, 1]])
     trans_vertices = renderer.transform_vertices(img, poses)
     img = renderer.render(img, trans_vertices, alpha=1)
     plt.figure(figsize=(8, 8))
     for bbox in bboxes:
         plt.gca().add_patch(patches.Rectangle((bbox[0], bbox[1]), bbox[2] - bbox[0], bbox[3] - bbox[1],linewidth=3,edgecolor='b',facecolor='none'))
     plt.imshow(img)
     plt.show()renderer = Renderer(
     vertices_path="../../pose_references/vertices_trans.npy",
     triangles_path="../../pose_references/triangles.npy"
 )
 threed_points = np.load('../../pose_references/reference_3d_68_points_trans.npy')
Training
Img2pose is implemented in PyTorch with having ResNet-18 backbone, it uses stochastic gradient descent(SGD) comprised with mini-batch in two pictures. The First 256 proposals are sampled for the RPN loss and 512/image for the pose head losses.
Note: On a single NVIDIA Quadro RTX 6000 machine, training takes almost 4 days.
Preparing dataset
- Download the WIDER FACE dataset from here
- Extract it inside dataset/WIDER_Face.
Now to run train and validation(LMDB), run below script.
 python3 convert_json_list_to_lmdb.py
 --json_list ./annotations/WIDER_train_annotations.txt
 --dataset_path ./datasets/WIDER_Face/WIDER_train/images/
 --dest ./datasets/lmdb/
 -—train
The above code will generate an LMDB dataset, which contains images with annotations and also produce a pose mean and std, files.
Now, let’s create LMDB containing validation images within annoatations.
 python3 convert_json_list_to_lmdb.py
 --json_list ./annotations/WIDER_val_annotations.txt
 --dataset_path ./datasets/WIDER_Face/WIDER_val/images/
 --dest ./datasets/lmdb
Train
 CUDA_VISIBLE_DEVICES=0 python3 train.py
 --pose_mean ./datasets/lmdb/WIDER_train_annotations_pose_mean.npy
 --pose_stddev ./datasets/lmdb/WIDER_train_annotations_pose_stddev.npy
 --workspace ./workspace/
 --train_source ./datasets/lmdb/WIDER_train_annotations.lmdb
 --val_source ./datasets/lmdb/WIDER_val_annotations.lmdb
 --prefix trial_1
 --batch_size 2
 --lr_plateau
 --early_stop
 --random_flip
 --random_crop
 --max_size 1400
Testing
If you can’t wait for days to finish training or don’t have a powerful GPU you can always download the pre-trained model from model ZOO here and extract it to your main directory of img2pose.
- Download arXiv model
Visualizing trained model
To test the trained model run the notebook:
- Visualize_trained_model_predictions Notebook
 threshold = 0.8
 total_imgs = 20
 data_iter = iter(lmdb_data_loader)
 for j in tqdm(range(total_imgs)):
     torch_img, target = next(data_iter)
     target = target[0]
     bboxes = []
     scores = []
     poses = []
     img = torch_img[0]
     img = img.squeeze()
     img = transforms.ToPILImage()(img).convert("RGB")
     ori_img = img.copy()
     run_img = img.copy()
     w, h = img.size
     min_size = min(w, h)
     max_size = max(w, h)
     # run on the original image size
     img2pose_model.fpn_model.module.set_max_min_size(max_size, min_size)
     res = img2pose_model.predict([transform(run_img)])
     res = res[0]
     for i in range(len(res["scores"])):
         if res["scores"][i] > threshold:
             bboxes.append(res["boxes"].cpu().numpy()[i].astype('int'))
             scores.append(res["scores"].cpu().numpy()[i].astype('float'))
             poses.append(res["dofs"].cpu().numpy()[i].astype('float'))
     (w, h) = img.size
     image_intrinsics = np.array([[w + h, 0, w // 2], [0, w + h, h // 2], [0, 0, 1]])
     plt.figure(figsize=(16, 16))
     poses = np.asarray(poses)
     bboxes = np.asarray(bboxes)
     scores = np.asarray(scores)
     if np.ndim(bboxes) == 1 and len(bboxes) > 0:
         bboxes = bboxes[np.newaxis, :]
         poses = poses[np.newaxis, :]
     if len(bboxes) != 0:
         ranked = np.argsort(poses[:, 5])[::-1]
         poses = poses[ranked]
         bboxes = bboxes[ranked]
         scores = scores[ranked]
         for i in range(len(scores)):
             if scores[i] > threshold:
                 bbox = bboxes[i]
                 pose_pred = poses[i]
                 pose_pred = np.asarray(pose_pred.squeeze())
                 trans_vertices = renderer.transform_vertices(img, [pose_pred])
                 img = renderer.render(img, trans_vertices, alpha=1)
                 plt.gca().add_patch(patches.Rectangle((bbox[0], bbox[1]), bbox[2] - bbox[0], bbox[3] - bbox[1],linewidth=3,edgecolor='b',facecolor='none'))
                 img = Image.fromarray(img)
         plt.imshow(img)
         plt.show()
AFLW2000-3D dataset evaluation
You can Download the AFLW2000-3D dataset and extract it to datasets/AFLW2000.
Run the notebook foir aflw_2000_3d_evaluation.
BIWI dataset evaluation
Same you can Download the BIWI dataset and extract it to datasets/BIWI.
And then Run the notebook biwi_evaluation.
Testing on your own images
Run following notebook test_own_images.
Conclusion
We learned a novel approach to 6DoF pose estimation and face alignment, that does not rely on any face detector or localizing facial landmarks. This is the first multi-pose, multi-face, direct approach for complex images. To learn more about pose estimation and computer vision techniques, you can check out the below resources.


